간단한 개요
근원지에서 목적지로 데이터를 보낸다. 데이터를 보내기 위해서는 데이터를 잘게 쪼개야 한다.
Data // from ~ to ~
쪼개는 단위 ByteStream -> InputStream -> OutputStream
문자를 보낼 때에는 CharacterStream : 2byte 단위로 데이터를 보냄.
이를 위해서 Reader / Writer 2개의 클래스를 만들었다.
■ 스트림(Stream)이란?
데이터를 목적지로 입출력하기 위한 방법이다.
스트림에 데이터를 쓸 수 있고, 스트림에서 데이터를 읽을 수 있다.
연결하고자 하는 Device에 따라 다양한 스트림이 존재
■ 스트림의 특징
Input은 입력만, Output은 출력만
지연(블락킹)
CPU와 RAM IO 사이의 속도 차이를 해소하기 위해 Channel이라는 게 있다. (버퍼 이용)
NIO는 아예 채널이라는 클래스가 있다.
1. 스트림의 용도에 의한 분류
1차 스트림 : Device에 직접적으로 연결되는 스트림
2차 스트림 : Device와 직접 연결되지 않으므로, 1차 스트림과 연결을 통해서만 Device에 연결될 수 있다. 부가적인 기능들을 가지고 있음
2. 데이터 전송 방향에 의한 분류
입력 스트림 : Device로부터 데이터를 읽어오는 스트림
출력 스트림 : Device로 데이터를 기록하는 스트림
3. 데이터 전송 단위에 의한 분류
바이트 스트림 : 한 byte 단위로 읽고, 쓸 수 있는 스트림
문자 스트림 : 한 문자(2byte) 단위로 읽고, 쓸 수 있는 스트림
4. File Class
파일은 일반 파일 + 폴더를 의미한다.
File 클래스는 파일 혹은 디렉토리의 등록정보를 표현하는 클래스
File 클래스는 실제 파일의 내용을 포함하지 않는다. (내용이 없어도 상관이 없다)
File 객체는 실제 파일의 존재여부와 상관없이 생성된다.
□ 생성자
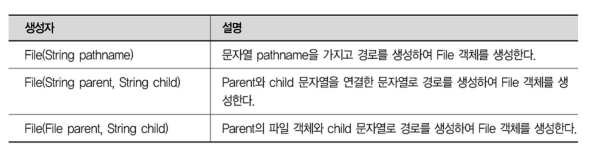
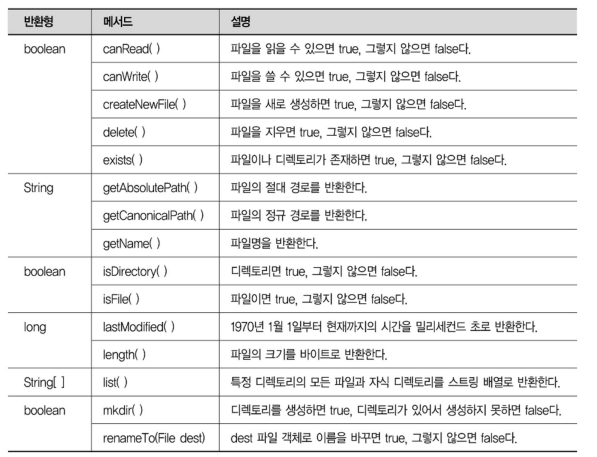
□ 주요 메소드
□ 파일 활용예제 1 : 파일 정보 출력
package jun.java.exam01;

import java.io.File;

public class FileEx1 {
	public static void main(String[] args) {
		File file = new File("c:/myProject/hello.txt");
		System.out.println("파일인지 여부 : " + file.isFile());
		System.out.println("디렉토리인지 여부 : " + file.isDirectory());
		System.out.println("상대경로 : " + file.getPath());
		System.out.println("절대경로 : " + file.getAbsolutePath());
		System.out.println("디렉토리 혹은 파일의 이름 : " + file.getName());
		System.out.println("파일의 길이 : " + file.length());
		System.out.println("파일의 최종 수정 날짜 : " + file.lastModified());
	}
}
□ 파일 활용예제 2 : 파일 목록 출력
package jun.java.exam02;

import java.io.File;
public class FileEx2 {

	public static void main(String[] args) {
		File directory = new File("c:/");
		if(directory.exists()) {
			if(directory.isDirectory()) {
				// 현재 디렉토리 내의 모든 파일 디렉토리의 이름 얻기
				String[] fileNameList = directory.list();
				for (String fileName : fileNameList){
					File file = new File(directory, fileName);
					if(file.isFile()) {
						System.out.println("파일이름  : " + file.getName() + "파일크기 : " + file.length() + "bytes");
					}
					else {
					System.out.println("폴더이름  : " + file.getName() + " 파일크기 : " + file.length() + "bytes");
					}
				}
			}
		}
	}
}
□ 파일 활용 예제 3 : 파일, 디렉토리 생성 및 삭제 변경
package jun.java.exam03;

import java.io.File;
import java.io.IOException;
public class FileEx3 {
	public static void main(String[] args) throws IOException {
		// 파일생성
		File f1 = new File("c:/myProject/newFile.txt"); // 빈 파일이 만들어짐
		if(f1.exists()) {
			System.out.println("파일이름 : " + f1.getName());
		} else {
			// IOException 발생
			if(f1.createNewFile()) {
				System.out.println("새로운 파일을 만들었습니다.");
			}else {
				System.out.println("파일생성에 실패했습니다.");
			}
		}
		// 디렉토리 생성
		File f2 = new File("c:/myProject/newDirectory");
		if(f2.exists()) {
			if(f2.mkdir()) System.out.println("폴더를 생성했습니다.");
			else System.out.println("폴더생성에 실패했습니다.");
		}
		else {
			System.out.println("디렉토리 이름 : " + f2.getPath());
		}
		// 파일 혹은 디렉토리 삭제
		File f3 = new File("c:/myProject/text.txt");
		if(f3.exists()) {
			if(f3.delete()) System.out.println("text.txt를 삭제하셨습니다");
			else System.out.println("다른곳에 사용중입니다.");
		}else {
			System.out.println("text.txt가 존재하지 않습니다.");
		}
		// 파일 혹은 디렉토리 이름 변경
		File src = new File("c:/myProject/newFile.txt");
		File dest = new File("c:/myProject/newDirectory/dest.txt");
		File dest2 = new File("c:/myProject/newDirectory/dest2.txt");

		if(src.exists()) {
			if(src.renameTo(dest)) System.out.println("dest.txt로 이동성공");
			else System.out.println("dest.txt로 이동실패");
			if(src.renameTo(dest2)) System.out.println("dest2.txt로 이동성공");
			else System.out.println("dest2.txt로 이동실패");
		}
		if(f2.isDirectory()) { // 디렉토리의 목록을 출력함
			String dir[] = f2.list();
			System.out.println("\n\nDir Content : =============\n");
			for(String dirs : dir) {
				System.out.println("dirs : " + dirs);
			}
		}
	}
}
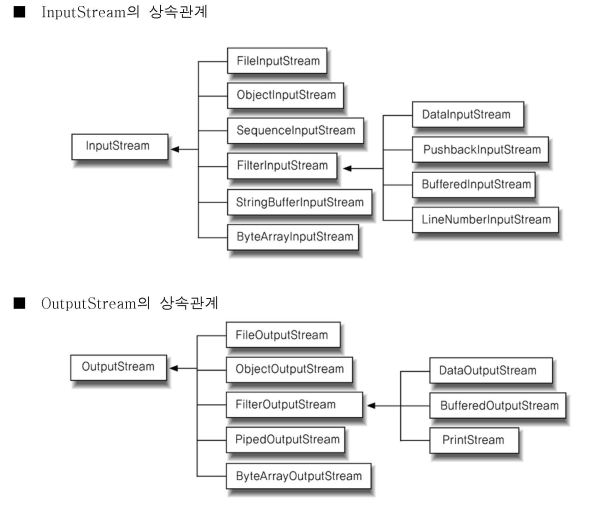
■ ByteStream의 상속관계
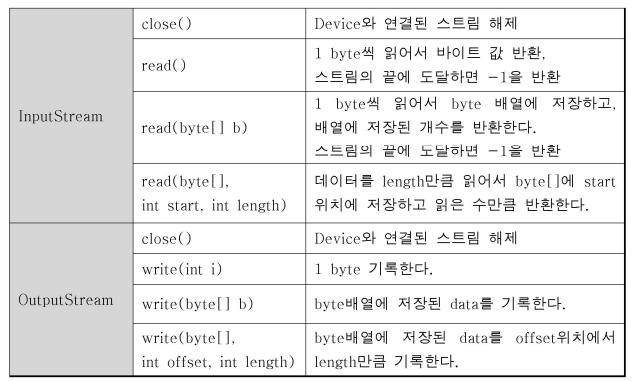
■ ByteStream의 주요 메소드
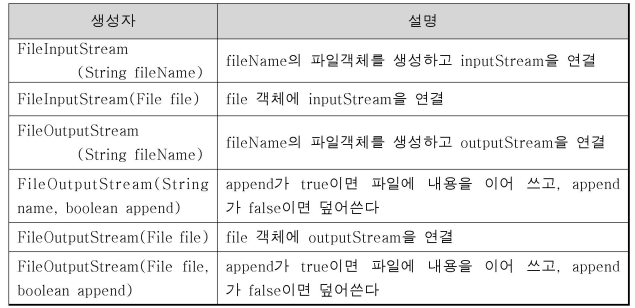
■ FileInputStream과 FileOutputStream
바이트 단위로 파일 내용을 읽어 들이거나, 파일에 내용을 기록할 때 사용하는 스트림
□ 주요 생성자
□ FileInputStream 활용예제
package jun.java.exam04;

import java.io.FileInputStream;
import java.io.FileNotFoundException;
import java.io.IOException;

public class FileInputStreamEx {
	public static void main(String[] args) {
		FileInputStream fis = null;
		byte _read[] = new byte[512];
		byte console[] = new byte[100];
		 // console : 키보드 입력 100바이트에 나머지는 스페이스바 처리
		try {
			System.out.print("파일명 : ");
			System.in.read(console);
			String file = new String(console).trim();
			fis = new FileInputStream(file);
			fis.read(_read, 0, _read.length);
			System.out.println(new String(_read).trim());
			int readByte = 0;
			while((readByte = fis.read()) != -1) {
				System.out.print((char)readByte);
			}
		} catch(FileNotFoundException fnfe) {
			fnfe.printStackTrace();
		} catch(IOException ie) {
			ie.printStackTrace();
		} finally {
			try {
				if(fis != null) fis.close();
			} catch(IOException ioe) {
				ioe.printStackTrace();
			}
		}
	}
}
결과 보면 한글이 깨진다 , (2byte이기 때문)
배열에 담기면 안 깨진다.
(주석 처리된거 풀고 , read[] 를 512 정도로 할당)
□ FileOutputStream 활용예제
package jun.java.exam05;

import java.io.FileNotFoundException;
import java.io.FileOutputStream;
import java.io.IOException;

public class FileOutputStreamEx {
	public static void main(String[] args) {
		FileOutputStream fos = null;
		try {
			fos = new FileOutputStream("c:/myProject/fileout.txt");
			String message = "Hello FileOutputStream!";
			fos.write(message.getBytes());
			// getBytes : String을 byte[]로 변환해주는 메소드
			// fos.close();
		} catch(FileNotFoundException fnfe) {
			fnfe.printStackTrace();
		} catch(IOException ie) {
			ie.printStackTrace();
		} finally {
			try {
				if(fos != null) fos.close();
			} catch(IOException ioe) {
				ioe.printStackTrace();
			}
		}
	}
}
□ 파일복사 예제1 : 1byte 단위로 복사
package jun.java.exam06;

import java.io.File;
import java.io.FileInputStream;
import java.io.FileNotFoundException;
import java.io.FileOutputStream;
import java.io.IOException;

public class FileCopyEx1 {
	public static void main(String[] args) {
		System.out.println("파일복사 시작");
		long start = System.currentTimeMillis();
		FileInputStream src = null;
		FileOutputStream dest = null;
		try {
			// 원본 파일을 읽기 위한 FileInputStream 객체 생성
			src = new FileInputStream(new File("c:/myProject/src.zip"));
			// 복사본 파일을 생성하기 위한 FileOutputStream 객체 생성
			dest = new FileOutputStream(new File("c:/myProject/dest.zip"));
			//FileInputStream을 통해서 읽어들인 값을 저장할 변수
			int readValue = 0;
			// FileInputStream의 read() 메소드를 통해서 읽어들인 값을
			// readValue에 저장
			while((readValue = src.read()) != -1) {
				// readValue에 저장된 값을 FileOutputStream의 write()
				// 메소드를 통해서 파일에 기록
					dest.write(readValue);}
			} catch(FileNotFoundException fnfe) {
				fnfe.printStackTrace();
			} catch(IOException e) {
				e.printStackTrace();
			} finally {
				try {
					if(dest != null) {dest.close();}
				} catch(IOException e) {}
			}
			long end = System.currentTimeMillis();
			long copyTime = (end - start);
			System.out.println("걸린 시간 : " + copyTime + "초");
	}
}
□ 파일복사 예제2 : byte[]을 이용한 복사
package jun.java.exam07;

import java.io.File;
import java.io.FileInputStream;
import java.io.FileNotFoundException;
import java.io.FileOutputStream;
import java.io.IOException;

public class FileCopyEx2 {
	public static void main(String[] args) {
		System.out.println("파일복사 시작");
		long start = System.currentTimeMillis();
		FileInputStream src = null;
		FileOutputStream dest = null;
		try {
			src = new FileInputStream(new File("c:/myProject/src.zip"));
			dest = new FileOutputStream(new File("c:/myProject/dest.zip"));
			// 임시저장소에 저장된 data의 전체갯수를 저장할 변수
			int length = 0;
			// 임시저장소로 사용될 byte[] 배열 선언
			byte[] buffer = new byte[1024*8];
			// InputStream을 통해서 읽어들인 data를 임시저장소에
			// 쌓고 저장된 data의 갯수를 length에 저장한다.
			while((length = src.read(buffer)) != -1) {
				// OutputStream을 통해서 임시저장소에 쌓여있는
				// data를 length만큼 파일에 기록한다.
					dest.write(buffer, 0, length);}
			} catch(FileNotFoundException e) {
				e.printStackTrace();
			} catch(IOException e) {
				e.printStackTrace();
			} finally {
				try {
					if(dest != null) {dest.close();}
				} catch(IOException e) {}
				try {
					if(src != null) {src.close();}
				} catch(IOException e) {}
			}
			long end = System.currentTimeMillis();
			long copyTime = (end - start);
			System.out.println("걸린 시간 : " + copyTime + "초");
	}
}
■ DataInputStream과 DataOutputStream
생성자가 중요하다
특정 데이터 타입과 포맷을 유지한 채 데이터를 기록하고 읽어올 수 있는 스트림
특정 데이터 타입과 포맷에 맞게 읽고 쓸 수 있는
readBoolean(), writeBoolean(boolean v), readLine(), writeInt(int v), readUTF(), writeUTF(String s) 등의 메소드를 제공.
□ 주요 생성자
- DataInputStream(InputStream stream)
- DataOutputStream(OutputStream stream)
□ DataOutputStream 활용 예제 : 여러 가지 자료형의 데이터를 파일에 기록
package jun.java.exam01;

import java.io.DataOutputStream;
import java.io.FileNotFoundException;
import java.io.FileOutputStream;
import java.io.IOException;

public class DataOutputStreamEx {
	public static void main(String[] args) {
		// DataOutputStreamEx은 기본자료형 타입 그대로 스트림을 통해서
		// 기록할 수 있다
		// DataOutputStream은 1차 스트림이 아니기 때문에 다른 스트림을
		// 이용해서 특정 Device와 연결될 수 있다.
		DataOutputStream dos = null;;
		FileOutputStream fos = null;
		try {
			// DataOutputStream과 연결된 FileOutputStream 객체생성
			fos = new FileOutputStream("c:/myProject/data.sav");
			// 보통은 확장자를 ser로 주는데 여기선 그냥 sav
			// 기본자료형의 타입을 유지할 채 기록할 수 있는
			// DataOutputStream 객체 생성
			dos = new DataOutputStream(fos);
			int i = 10;
			double d = 3.15;
			String s = "JAVA프로그램";
			// DataOutputStream은 기본자료형별로 write메소드가 존재
			dos.writeInt(i);
			dos.writeDouble(d);
			dos.writeUTF(s);
		} catch(FileNotFoundException e) {
			e.printStackTrace();
		} catch(IOException e)
		{
			e.printStackTrace();
		}finally {
			try {
				if(fos != null) {fos.close();}
			} catch(IOException e) {}
			try {
				if(dos != null) {dos.close();}
			} catch(IOException e) {}
		}
	}
}
// 메모장으로 열면 문자가 깨지는데 그럴 때 DataInputStreamEx로 실행한다.
□ DataInputStream 활용 예제 : 특정 자료형의 포맷과 값을 유지한 채로 읽어오기
package jun.java.exam02;

import java.io.DataInputStream;
import java.io.FileInputStream;
import java.io.FileNotFoundException;
import java.io.IOException;

public class DataInputStreamEx {
	public static void main(String[] args) {
		FileInputStream fis = null;
		DataInputStream dis = null;
		try {
			fis = new FileInputStream("c:/myProject/data.sav");
			dis = new DataInputStream(fis);
			// DataInputStream은 기본자료형을 유지한 채로 저장된
			// 값을 읽어들일 수 있는 read 메소드가 존재한다.
			// 읽어들일 때는 반드시 기록한 순서대로 읽어와야 한다.
			int i = dis.readInt();
			double d = dis.readDouble();
			String s = dis.readUTF();
			System.out.println("i값 : " + i);
			System.out.println("d값 : " + d);
			System.out.println("s값 : " + s);
		} catch(FileNotFoundException e) {
			e.printStackTrace();
		} catch(IOException e) {
			e.printStackTrace();
		} finally {
			try {
				if(fis != null) {fis.close();}
			} catch(IOException e) {}
			try {
				if(dis != null) {dis.close();}
			} catch(IOException e) {}
		}
	}
}
■ 문자 스트림
바이트 스트림에 추가하여 Reader와 Writer 클래스를 제공하는데, 이것은 2바이트를 입출력할 수 있는 문자 기반 스트림이다.
바이트 스트림은 1바이트를 입출력하기 때문에 일반적으로 영문자로 구성된 파일, 동영상 파일, 음악 파일의 입출력 등에 적합한 스트림이다.
문자 스트림은 2바이트를 입출력하기 때문에 세계 모든 언어로 구성된 파일을 입출력 하기에 적합하다.
FileInputStream & FileOutputStream은 글자를 찍어낸다기 보내는 파일을 복사하는 개념이다.
Reader, Writer는 찍어내는 개념
FileReader, BufferedReader 는 읽어내는 개념.
출력은 flush가 있어서 힘들까? -> PrintStream
print / println은 기본적으로 오토플러쉬가 된다.
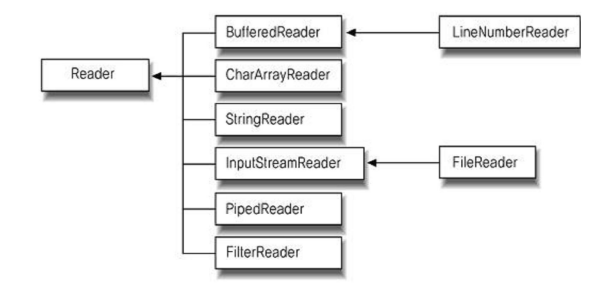
■ 문자 Stream의 상속관계
□ Reader의 상속관계
□ Writer의 상속관계

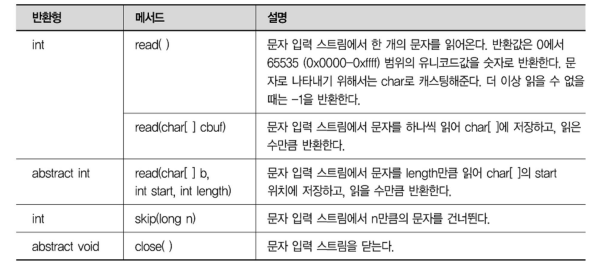
■ 문자 Stream의 주요 메소드
□ Reader의 주요 메소드
□ Writer의 주요 메소드
■ FileReader와 FileWriter
문자 단위로 파일 내용을 읽어 들이거나, 파일에 내용을 기록할 때 사용하는 스트림
텍스트 기반의 파일만을 읽고 쓸 수 있다.
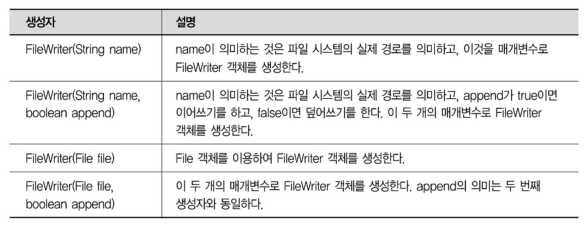
1. FileReader의 생성자

2. FileWriter의 생성자
□ FileWriter 활용예제 : 파일에 텍스트 기록하기
package jun.java.exam03;

import java.io.FileNotFoundException;
import java.io.FileWriter;
import java.io.IOException;

public class FileWriterEx {
	public static void main(String[] args) {
		FileWriter writer = null;
		try {
			// 파일에 한 문자 단위로 기록할 수 있는 FileWriter 객체 생성
			writer = new FileWriter("c:/myProject/song.txt", true); // default가 false이기 때문에 덮어 쓰기 처리
			// writer는 문자열을 바로 기록할 수 있다.
			String str = "학교종이 땡땡땡 어서 모이자\n";
			writer.write(str);
			// 한 글자 단위로 읽고 쓸 수 있는 Reader, Writer 계열의
			// 스트림은 내부적으로 버퍼를 내장하고 있다.
			// 내장된 버퍼는 버퍼가 가득채워 질 때에만 스트림을 통해
			// 내보낸다. flush()는 버퍼가 가득차지 않아도 비우게 한다.
			writer.flush(); // character 배열이 아닌 이상 무조건 flush
		} catch(FileNotFoundException e) {
			e.printStackTrace();
		} catch(IOException e) {
			e.printStackTrace();
		} finally {
			try {
				if(writer != null) {writer.close();}
			} catch(IOException e) {}
		}
	}
}
□ FileReader 활용예제 : 파일로부터 한 문자씩 텍스트 읽기
package jun.java.exam04;

import java.io.FileNotFoundException;
import java.io.FileReader;
import java.io.IOException;

public class FileReaderEx {
	public static void main(String[] args) {
		FileReader reader = null;
		try {
			// 파일로부터 한 문자 단위로 읽어올 수 있는 FileReader 객체 생성
			reader = new FileReader("c:/myProject/song.txt");
			// 스트림을 통해서 읽어들인 유니코드값을 저장할 변수
			int readValue = 0;
			while((readValue = reader.read()) != -1) {
				System.out.print((char)readValue);
			}
		} catch(FileNotFoundException e) {
			e.printStackTrace();
		} catch(IOException e) {
			e.printStackTrace();
		} finally {
			try {
				if(reader != null) {reader.close();}
			} catch(IOException e) {}
		}
	}
}
■ Bridge 스트림과 Buffered 스트림
□ 브릿지(Bridge) 스트림 : 바이트 스트림을 문자스트림으로 변환하는 스트림
1. InputStreamReader : 바이트 입력 스트림을 문자 입력스트림으로 변환
InputStreamReader isr = new InputStreamReader(System.in);
2. OutputStreamWriter : 바이트 출력 스트림을 문자 출력스트림으로 변환
FileOutputStream fos = new FileOutputStream("c:/hello.txt);
OutputStreamWriter = new OutputStreamWriter(fos);
□ Buffered 스트림 : 스트림의 읽고 쓰는 성능을 개선하기 위해 스트림 내부에 버퍼를 가지고 있는 스트림
1. BufferedInputStream, BufferOutputStream
2. BufferedReader, BufferedWriter
▣ BufferedReader 스트림
- BufferedReader는 readLine() 메소드 제공
- readLine() 메소드는 스트림으로부터 한 라인씩 읽을 수 있다.
- readLine() 메소드는 문자열을 반환하면, 스트림의 끝에 도달하면 null을 리턴한다.
- 개행문자의 앞까지 읽어온다.
□ BufferedWriter 활용예제 : 텍스트에 문자 기록하기
package jun.java.exam05;

import java.io.BufferedWriter;
import java.io.FileWriter;
import java.io.IOException;

public class BufferedWriterEx {
	public static void main(String[] args) {
		FileWriter fw = null;
		BufferedWriter bw = null;
		try {
			fw = new FileWriter("c:/myProject/hello.txt");
			bw = new BufferedWriter(fw);
			bw.write("BufferedWriter 테스트입니다.");
			bw.newLine();
			bw.write("안녕하세요" +
					System.getProperty("line.separator")); // 줄 바꾸는 것
			bw.write("반갑습니다");
			bw.flush();
		} catch (IOException ioe) {
			ioe.printStackTrace();
		} finally {
			try {if(fw != null)fw.close();} catch(IOException ioe) {}
			try {if(bw != null)bw.close();} catch(IOException ioe) {}
		}
	}
}
□ BufferedReader 활용예제 : 텍스트로부터 문자읽기
package jun.java.exam06;

import java.io.BufferedReader;
import java.io.FileInputStream;
import java.io.FileNotFoundException;
import java.io.IOException;
import java.io.InputStreamReader;

public class BufferedReaderEx {
	public static void main(String[] args) {
		FileInputStream fis = null;
		InputStreamReader isr = null;
		BufferedReader br = null;
		try {
			fis = new FileInputStream("c:/myProject/hello.txt");
			isr = new InputStreamReader(fis);
			br = new BufferedReader(isr);
			// 한 라인씩 읽어들인 문자열을 저장할 변수
			String str = null;
			// readLine() 개행문자를 만나면 개행문자 이전까지의
			// 문자열을 반환하고 스트림의 끝에 도달하면 null을 반환
			while((str = br.readLine()) != null) {
				System.out.println(str);
			}
		} catch(FileNotFoundException e) {
			e.printStackTrace();
		} catch(IOException e) {
			e.printStackTrace();
		} finally {
			try {if(br != null)br.close();} catch(IOException e) {}
			try {if(isr != null)isr.close();} catch(IOException e) {}
			try {if(fis != null)fis.close();} catch(IOException e) {}
		}
	}
}
■ PrintStream과 PrintWriter
1. PrintStream
PrintStream은 모든 자료형을 출력할 수 있는 print(), println() 메소드가 오버로딩 되어있다.
프로그램이 시작되면 장치와 연결된 출력스트림인 System.out, System.err 객체가 PrintStream 객체이다.
다른 스트림과는 다르게 플러쉬기능을 자동으로 처리할 수 있는 생성자를 가지고 있다.
모든 메소드의 예외처리를 하지 않았다는 점이다.
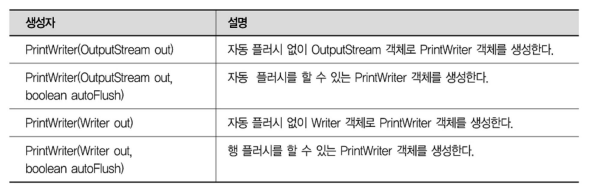
2. PrintWriter
PrintWriter 클래스는 다른 스트림과 다르게 바이트 출력 스트림과 문자 출력 스트림을 가지고 객체를 생성할 수 있는 클래스이다.
자동 플러쉬 기능을 가지고 있다.
PrintWriter 클래스의 생성자에는 FileNotFoundException 예외를 발생하기 때문에 반드시 예외처리를 해야 한다.
□ PrintStream 활용예제 : 파일에 문자 기록하기
package jun.java.exam07;

import java.io.BufferedOutputStream;
import java.io.FileOutputStream;
import java.io.IOException;
import java.io.PrintStream;

public class PrintStreamEx {
	public static void main(String[] args) {
		FileOutputStream fos = null;
		BufferedOutputStream bos = null;
		PrintStream ps = null;

		try {
			fos = new FileOutputStream("c:/myProject/printStream.txt");
			bos = new BufferedOutputStream(fos);
			ps = new PrintStream(bos, true);
			ps.println("홍길동");
			ps.println(1234);
			ps.println(true);
			ps.println('a');
		} catch(IOException ie) {
			ie.printStackTrace();
		} finally {
			if(ps != null) ps.close();
			try {if(bos != null) bos.close();} catch (IOException ioe) {ioe.printStackTrace();}
			try {if(fos != null) fos.close();} catch (IOException ioe) {ioe.printStackTrace();}
		}
	}
}
package jun.java.exam08;

import java.io.BufferedOutputStream;
import java.io.FileOutputStream;
import java.io.IOException;
import java.io.PrintWriter;

public class PrintWriterEx {
	public static void main(String[] args) {
		FileOutputStream fos = null;
		BufferedOutputStream bos = null;
		PrintWriter ps = null;
		try {
			fos = new FileOutputStream("c:\\myProject\\printWriter.txt");
			bos = new BufferedOutputStream(fos);
			ps = new PrintWriter(bos, true);
			ps.println("안녕하세요");
			ps.println("또 만났네요.");
			ps.println(100.0);
			ps.println(Boolean.valueOf(false));
		} catch (IOException ioe) {
			ioe.printStackTrace();
		} finally {
			if(ps != null) ps.close();
			try {
				if(bos != null) bos.close();
			} catch (IOException ioe) {}
			try {
				if(fos != null) fos.close();
		} catch (IOException ioe) {}
		}
	}
}
■ Scanner Class
JDK5.0에서는 java.util 패키지에 Scanner 클래스를 제공하고 있다.
Scanner 클래스는 입력값(문자열, 파일, 입력 스트림)을 정규 표현식으로 구분하여 문자열이나 기본 데이터 타입으로 토큰할 수 있는 클래스이다. 정규 표현식이란 언어를 표현할 수 있는 문자식을 말한다.
이렇게 구분된 토큰은 다양한 nextXXX() 메소드를 사용하여 다른 타입의 값으로 바뀌게 된다.
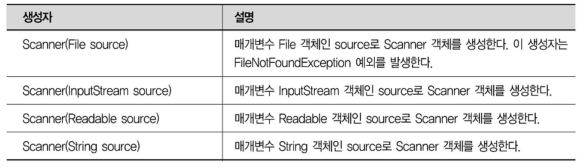
1. 생성자
Scanner 클래스는 매개변수로 네 가지 타입을 갖는다.
네 가지 타입 : File, InputStream, Readable, String
Scanner 클래스는 네 가지 타입을 매개변수로 구분자나 구분 패턴을 사용하여 문자열이나 기본 데이터 타입으로 토큰 할 수 있는 클래스이다.
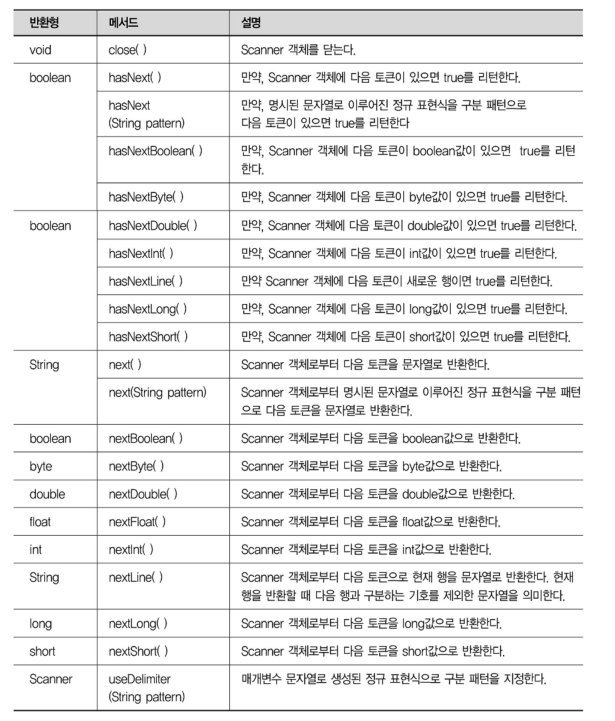
2. 주요 메소드
□ 키보드로 입력한 값을 int로 변환한 예

□ File 클래스를 이용한 double로 변환한 예
□ 문자열을 구분 패턴으로 변환한 예
□ 스트림을 이용한 구분 패턴으로 변환한 예
□ Scanner 활용예제1 : 키보드로부터 숫자 입력받기
package jun.java.exam01;

import java.util.Scanner;

public class ScannerEx1 {
	public static void main(String[] args) {
		System.out.print("입력 : ");
		Scanner scan = new Scanner(System.in);
		int number = scan.nextInt();
		System.out.printf("스캔 : %d", number);
		scan.close();
	}
}
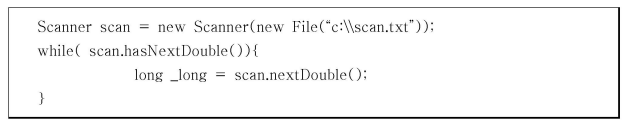
□ Scanner 활용예제2 : 파일로부터 읽어오기
package jun.java.exam02;

import java.io.File;
import java.io.IOException;
import java.util.Scanner;

public class ScannerEx2 {
	public static void main(String[] args) {
		Scanner scan = null;
		try {
			scan = new Scanner(new File("c://myProject/scan.txt"));
			while(scan.hasNextDouble()) {
				System.out.printf("스캔 double : %,.2f %n", scan.nextDouble());
			}
			scan.close();
		} catch(IOException ioe) {
			ioe.printStackTrace();
		} finally {
			if(scan != null) scan.close();
		}
	}
}
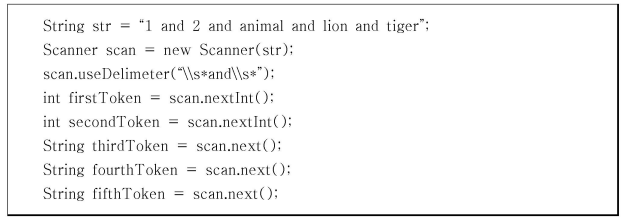
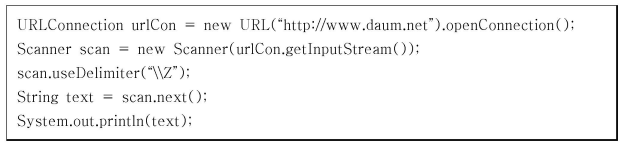
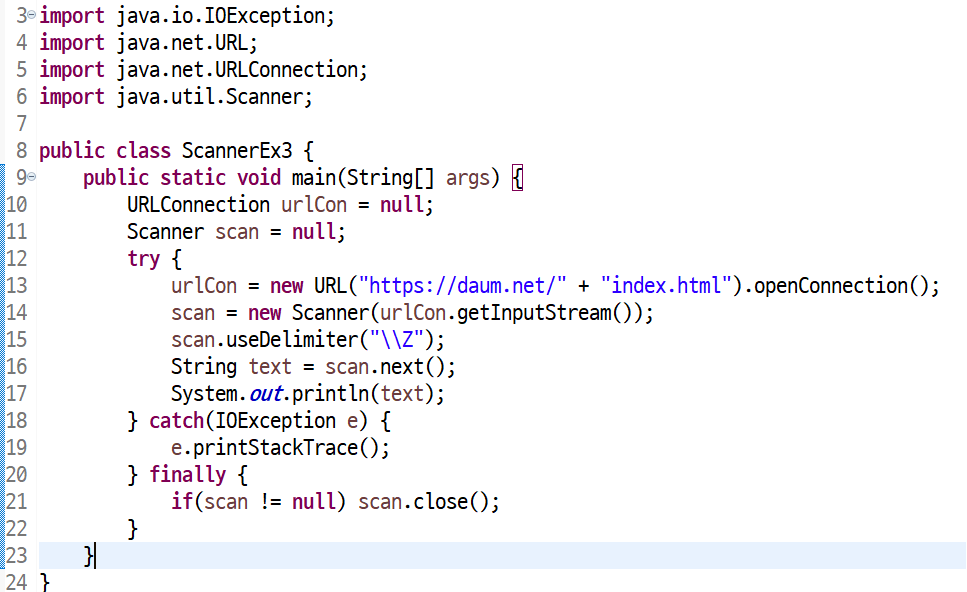
□ Scanner 활용예제3 : URL로부터 읽어오기
□ Scanner 활용예제4 : String으로부터 읽어오기
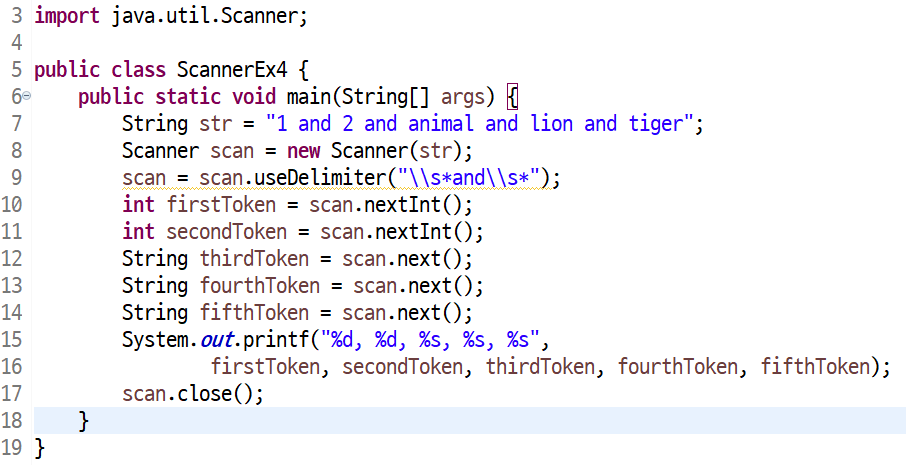
<결과>
1, 2, animal, lion, tiger
■ 객체의 직렬화
가상머신 안에 존재하는 특정 객체(객체의 메모리와 객체에 대한 정보)를 바이트 형태로 변환하는 것.
객체의 직렬화를 통해 프로그램이 실행되는 동안 생성된 객체를 스트림을 이용해서 지속적으로 보관하거나 전송할 수 있다.
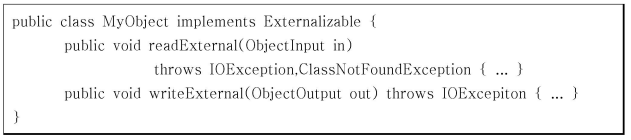
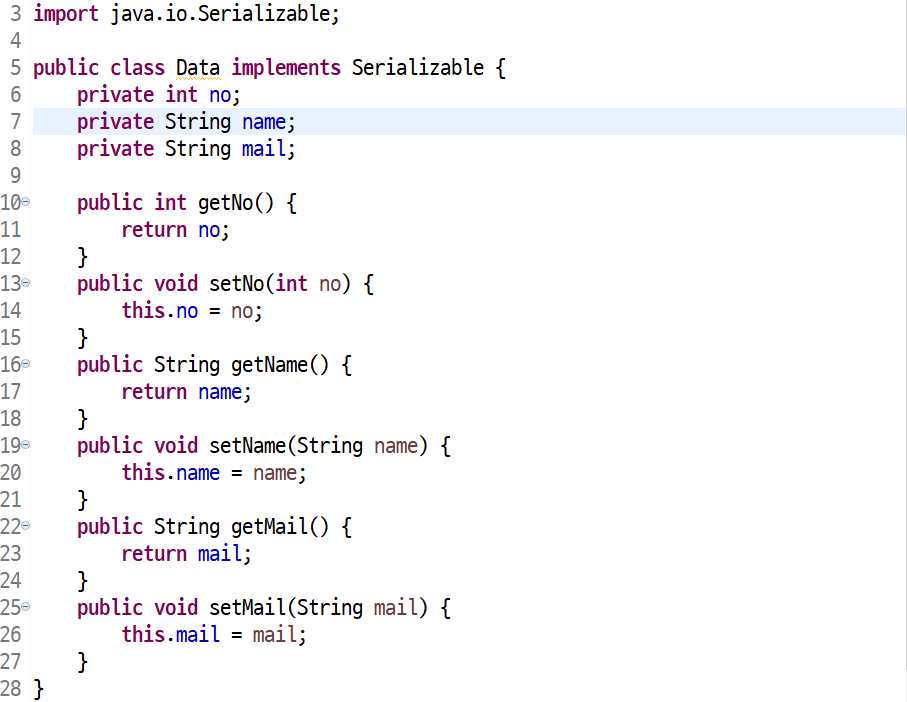
□ 직렬화 가능한 클래스를 만드는 방법
1) Serializable 인터페이스를 이용

2) Externalizable 인터페이스를 이용
□ 직렬화 예제 : 객체 직렬화하기
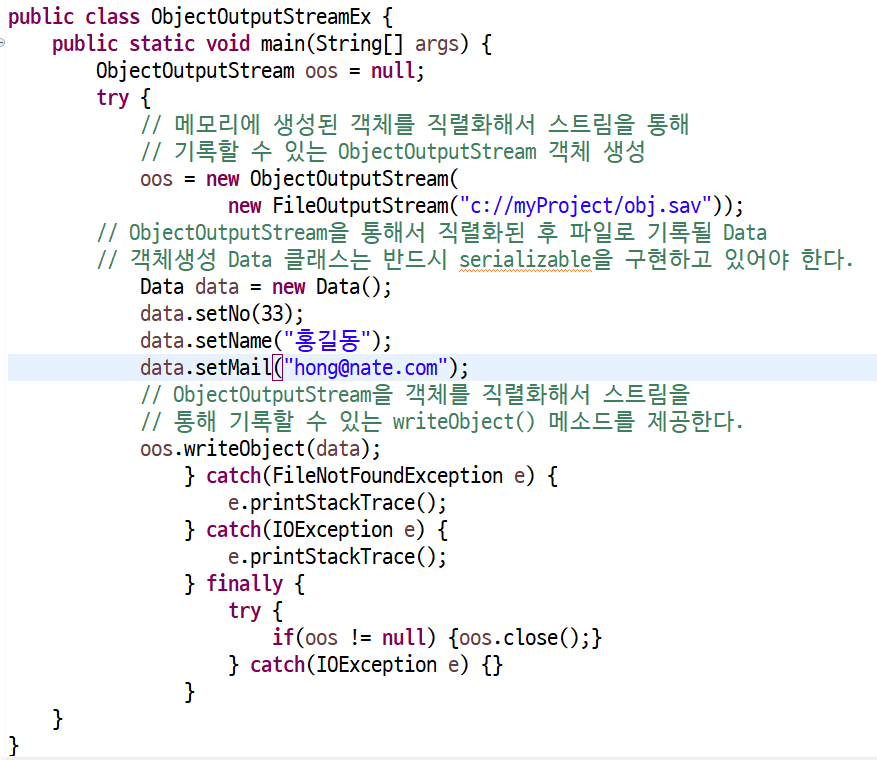
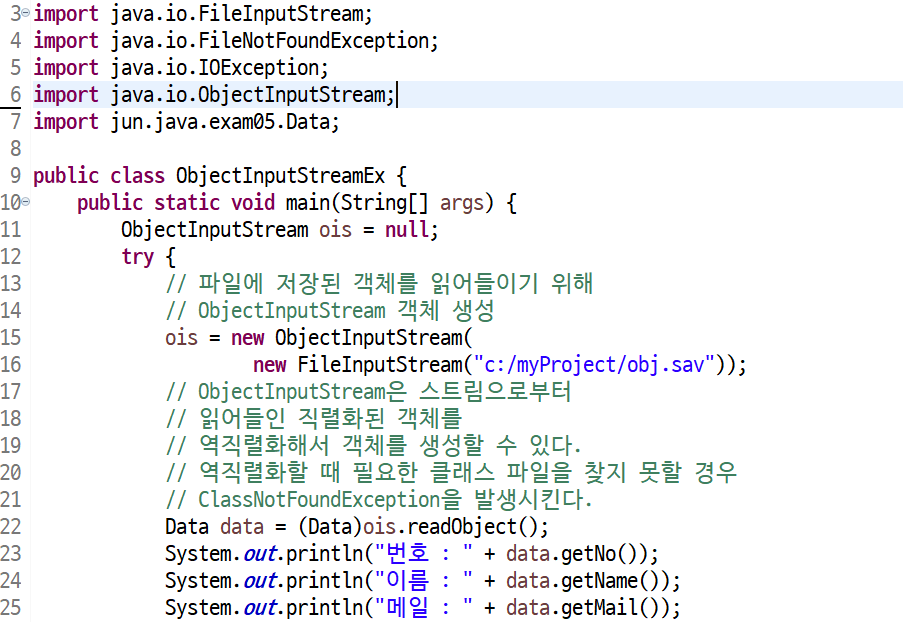
■ ObjectStream(객체 스트림)
ObjectOutputStream과 ObjectInputStream은 각각 객체를 직렬화, 역직렬화하는 메소드를 제공하는 스트림이다.
□ ObjectStream의 주요 생성자
ObjectOutputStream(OutputStream os)
ObjectInputStream(InputStream is)
□ ObjectStream의 주요 메소드

□ 참고 : transient (Serializable 인터페이스를 상속받았을 경우)
멤버변수를 직렬화 대상에서 제외하고자 할 때 사용한다.
멤버변수 앞에 명시한다.
□ ObjectOutputStream 활용예제 : 직렬화된 객체를 파일에 저장하기
□ ObjectInputStream 활용예제 : 역직렬화해서 파일에서 읽어오기
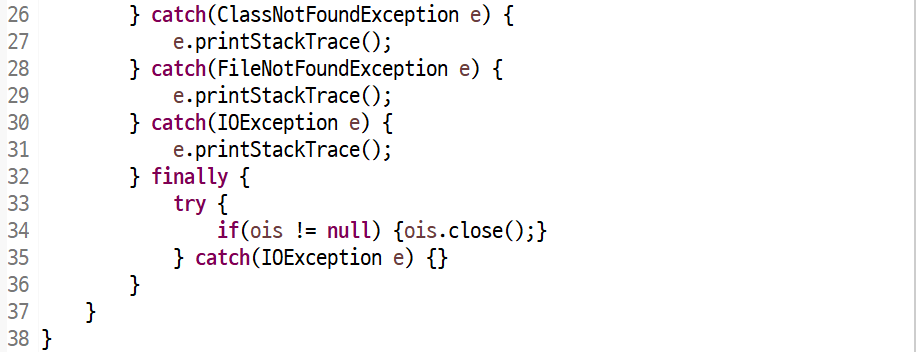
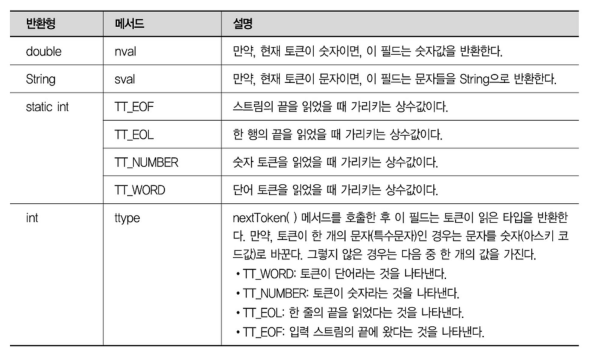
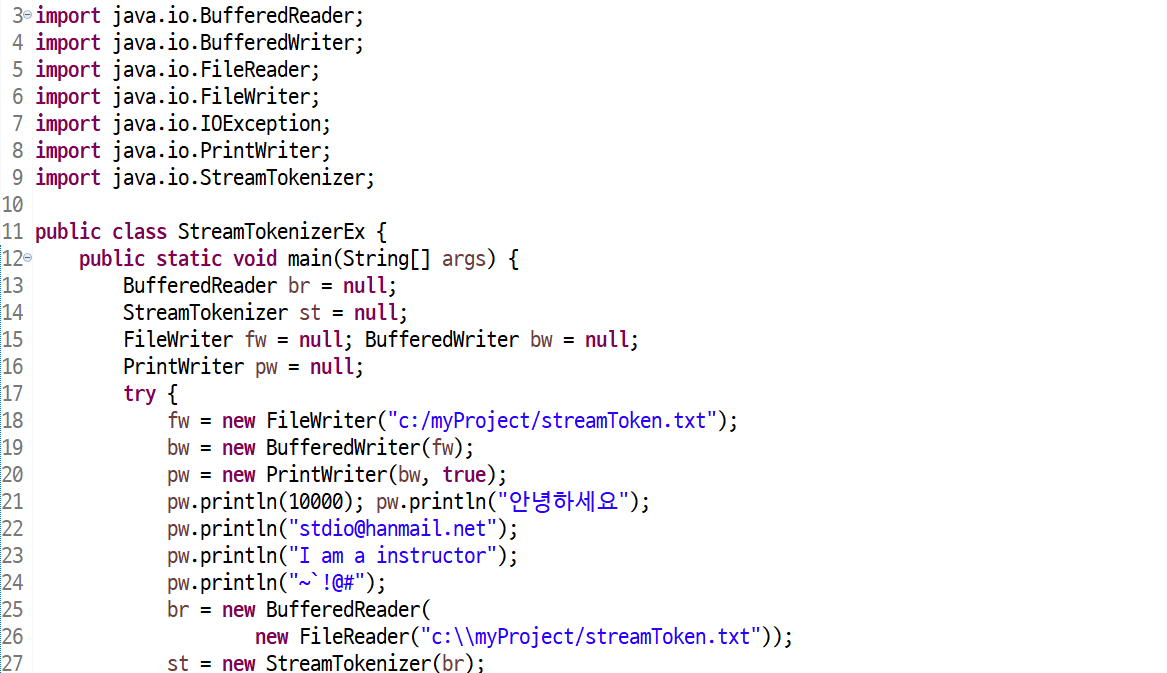
■ Stream Tokenizer
문자 입력 스트림을 토큰 단위로 나눠서 관리할 수 있는 클래스이다.
문자 입력 스트림을 읽을 때 토큰의 유형을 문자와 숫자로 구분할 수 있기 때문에 문자와 숫자로 구성된 파일을 읽을 유용하게 쓰일 수 있다.
□ 생성자

□ 주요 멤버
□ StreamTokenizer 활용예제
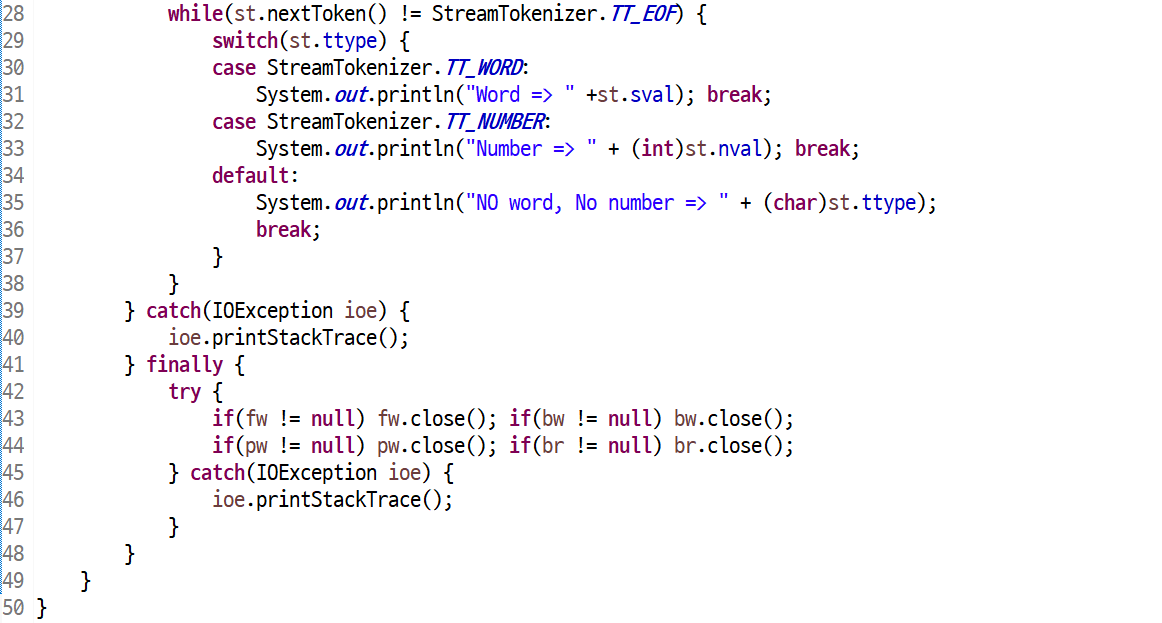
<결과>
Number => 10000
Word => 안녕하세요
Word => stdio
NO word, No number => @
Word => hanmail.net
Word => I
Word => am
Word => a
Word => instructor
NO word, No number => ~
NO word, No number => `
NO word, No number => !
NO word, No number => @
NO word, No number => #
■ RandomAccessFile
입력 스트림과 출력 스트림의 두 가지 기능을 가지고 있는 스트림이며, 기존의 입력 스트림과 달리 한 번 읽었던 입력 스트림을 다시 읽을 수 있는 스트림이다.
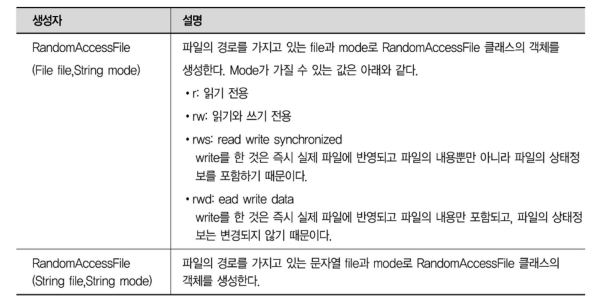
□ RandomAccessFile 활용예제
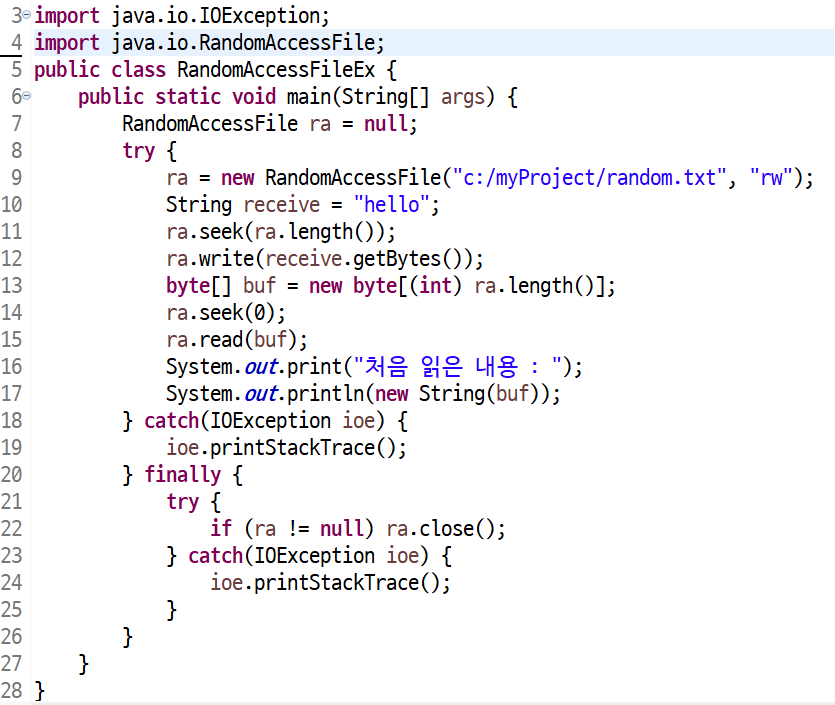
<결과>
처음 읽은 내용 : hello
'IT&코딩 > Java' 카테고리의 다른 글
| Java - 19일차 (Thread) - X (0) | 2022.11.09 |
|---|---|
| Java - 18일차 (AWT) (0) | 2022.11.09 |
| Java - 16일차 (Event) - X (0) | 2022.11.03 |
| Java - 15일차 (컬렉션과 제네릭) (0) | 2022.11.03 |
| Java - 14일차 (패키지, 예외처리, 단언) (0) | 2022.11.01 |

