■ Java Server Page
□ 기본
<%@ page import="java.util.Date"%>
<%@ page language="java" contentType="text/html; charset=EUC-KR"
    pageEncoding="EUC-KR"%>

<%-- jsp 주석

	<%@ %> : 지시어 (directive), 접두어(prefix)
	<%@ page %> 페이지 지시어

	charset에 사용되는 EUC-KR : 웹 클라이언트가 응답받는 페이지 인코딩방식
	pageEncoding에 사용되는 EUC-KR : 지금 페이지 jsp 자체의 인코딩 방식

--%>


<!DOCTYPE html>
<html>
<head>
<meta charset="EUC-KR">
<title>Insert title here</title>
</head>
<body>

<h2>오늘 날짜를 출력해보자</h2>

	<%! // 선언문 : declaration
		String aaa = "kongjoo";
	%>

	<%
		Date d1 = new Date(); // ctrl + shift + o는 작동 안 됨 (자바문법), ctrl + space

		// sysout 사용하지 않는다 이건 내 콘솔창에 출력하는 것
		// (서버에서) 웹 클라이언트로 전송하는 것이 출력
		out.println(d1);
	%>
	<br>
	<%= d1 %>
	<!-- expression, 표현식 -->
	<br>
	<%
		String aa = "ondal";
		out.println(aa);
	%>
	<br>
	<%
		out.println(aaa);
	%>
	<br>
	<!--
		html에 자바를 넣는 방법
		scriptlet, expression, delaration

		jsp의 내장객체 9개중
		out(웹클라이언트로 전송하여 출력시키는), request(요청담당),
	-->

	<%
		Date d11 = new Date();
		out.println("날짜 출력 : " + d11 + "<br>");
		out.println(request.getRequestURI() + "==> 이것이 요청한 url이구나");
	%>

	<!--
		<출력결과>
		오늘 날짜를 출력해보자
		Thu May 18 17:35:08 KST 2023
		Thu May 18 17:35:08 KST 2023
		ondal
		kongjoo
		날짜 출력 : Thu May 18 17:35:08 KST 2023
		/HelloWeb2/517_000_date.jsp==> 이것이 요청한 url이구나

		해당 페이지 url : http://localhost:8080/HelloWeb2/517_000_date.jsp
												/프로젝트이름/파일명.jsp

		여기서 request.getRequestURI() ==> /HelloWeb2/517_000_date.jsp
			 request.getParameter() ==> 요청된 쪽에서 넘어오는 값을 서버쪽에서 알게 하는 것
	-->

	<!--
		원래 오리지날은
		request가 있으면 .java(web java), 즉 서블릿이 받고 ==> .class ==> run


		request ==> 서버로 전송하면 ==> 서버에서 .jsp로 받는다. ==> .java ==> .class ==> run
		(변환시 파일명은 hello.jsp 작성시 hello_jsp.java로 변환)

		######
		그렇다면 hello_jsp.java 파일이 있는 곳은?
		(찾아가보자)
		윈도우탐색기 - 지금 사용하는 workspace 폴더 \.metadata\.plugins\org.eclipse.wst.server.core\
		tmp(0,1,2)\work\Catalina\localhost\
		프로젝트명\org\apache\jsp\Hello_jsp.java


	-->

</body>
</html>

<!--
	EUC-KR : 한글, 영어 2바이트
	UTF-8 : 영어 1바이트, 한글/중어/일어 : 3바이트, 1919 문자 : 2바이트
-->
□ 기본2
<%@page import="java.util.Random"%>
<%@ page language="java" contentType="text/html; charset=EUC-KR"
    pageEncoding="EUC-KR"%>
<!DOCTYPE html>
<html>
<head>
<meta charset="EUC-KR">
<title>Insert title here</title>
</head>
<body>
	Q) 34를 int에 넣은 후 홀수인지 짝수인지 출력하는 프로그램을<br>
	jsp로 작성해보삼(단, 스트립트릿)<br>

	<%
		int su = 34;
		if(su % 2 == 0){
			out.println("짝수입니다.");
		} else{
			out.print("홀수입니다.");
		}
	%>

	<h3>34 + 7을 표현식을 사용하여 출력하시오</h3>

	<%=34+7%><br>

	<h3>bb에 34를 넣고 +7을 출력하시오(단, 덧셈은 표현식으로)</h3>
	<%
		int bb = 34;
	%>
	<%=bb + 7%><br>

	Q) 34를 int에 넣은 후 홀수인지 짝수인지 출력하는 프로그램을<br>
	jsp로 작성해보삼(단, 스트립트릿, 그리고 if 2형으로 작성하며 표현식도 포함하여 작성하시오)<br>

	<%
		int cc = 34;

		if(cc % 2 == 0){
	%>
		<h1>보아하니 <%=cc%>는 짝수이군요</h1>
	<%
		} else{
	%>
		<h1>보아하니 <%=cc%>는 짝수이군요</h1>
	<%
		}
	%>

	Q) 간단한 로또 프로그램 작성(Random 내장 클래스 사용)(scriptlet, expression 사용)<br>
	(hint) Random r1 = new Random(), r1.nextInt()
	<br>
	<%
			Random r1 = new Random();
			// r1.nextInt() // int 범위만큼 -2147483648 ~ +2147483647
			// r1.nextInt(45) : 0 ~ 45 미만의 정수
			for(int i=0; i<6; i++){
				int a = r1.nextInt(45) + 1;
	%>
				<%=a%><br>

	<%
			}

	%>

	<h1>구구단 - scriptlet으로!</h1>

	<%
		for(int i=2; i<10; i++){
			for(int j=1; j<10; j++){
				out.print(i + " x " + j + " = " + i * j);
	%><br>
	<%
			}
	%>
			<br>
	<%
		}
	%>

</body>
</html>
□ 표현식(expression)
<%@ page language="java" contentType="text/html; charset=EUC-KR"
    pageEncoding="EUC-KR"%>
<!DOCTYPE html>
<html>
<head>
<meta charset="EUC-KR">
<title>Insert title here</title>
</head>
<body>

<%! // 선언문
	int bb = 50;
%>

<%
	int aa = 30;
	out.println(aa);
%>

	아하 <%=aa%>이네<br> <!-- 표현식(expression) -->

	<!-- 30 아하 30이네 -->

	<h1>구구단을 expression 방식으로 해보자</h1>

	<%
		for(int i=2; i<10; i++){
			for(int j=1; j<10; j++){
	%>
			<%=i%> x <%=j%> = <%=i * j%><br>
	<%
			}
	%>
			<br>
	<%
		}
	%>

</body>
</html>
□ get & post 파라미터
<%@ page language="java" contentType="text/html; charset=EUC-KR"
    pageEncoding="EUC-KR"%>
<!DOCTYPE html>
<html>
<head>
<meta charset="EUC-KR">
<title>Insert title here</title>

</head>
<body>

<!--  								===> request(요청)
			web client(web browser) ==> web server ==> web application server
									<=== response(응답)

	form-input으로 request, 처리한 결과를 server의 .jsp 웹문서를 통해 response
	(예) 로그인, 회원가입, 상품주문 및 결제

	Q) 로그인화면에서 id, pw를 입력받고(.html) 해당 id, pw를 서버로부터 확인 출력받는(by .jsp) 웹 프로그램 작성
-->

<!--
	method에서 get, post 방식으로
	#. get : head / body : head로 전송, 전송내용이 다 출력, 결과를 받을 때는 body
			주소?name=value&name=value
			전송시 영어는 그대로 전송, 한글 등 특수문자 %3% encoding
			보안문제에 관계없는 경우.
			고정길이 방식 : 128~2k, 길이계산, 상대적으로 속도가 빠름
			보내는 양이 비교적 적을 때, 기본형이 get


	- GET 방식에서 한글 깨질 때
		톰캣 - 왼쪽화면에서 servers 탭(폴더) - server.xml에
		URIEncoding="EUC-KR" (UTF-8)을 추가 입력함.
		즉, server.xml의 63라인쯤 <Coneenctor URIEncoding="EUC-KR" ==> 이것을 넣어줌
		connectionTimeout="20000" ports="8082"
		protocol = "HTTP/1.1" redirectPort="8443"/>

		cf. get 방식 한글 설정에서 단점은?
		1) 서버폴더를 찾아서 xml을 찾아서 일일이 추가
		2) 필요에 의해 톰캣 서버를 지웠다 다시 새로 만드는 일이 많은데 그럴 때마다 한글설정을 다시 해야 함.


	###
	이클립스의 톰캣 서버를 어떤 이유로 다시 잡아주고자 할 때
	- 서버 탭에서 마오하여 delete 클릭
	- 다시 잡아주는 방법은
	- 파란 줄 클릭하고 tomcat 8.5 확인하고
	- configure runtime environment를 클릭, 잡혀있는 tomcat remove하고 apply and close
	- next 클릭 - tomcat install directory 값을 지우고 - browse 클릭 - 톰캣 install 폴더를 찾아가되 bin 나오는 순간까지만 가고
	- 폴더 선택 클릭 - 그리고 finish

	- 이제 실행하면 실행은 되는데 액박 뜨는 현상이 발생할 수 있다.
	- 왜?
	- 프로젝트 이름 - 마우스 우클릭 - build path - config...
	- 그런다음 왼쪽메뉴에서 project facets - runtimes 탭을 클릭하고 tomcat 체크박스를 클릭
	- 그리고 apply and close - 액박이 사라진다.

	#### multi-path /...에러시
	- tomcat을 더블클릭하면 서버정보화면이 나온다. 아래부분에 overview와 modules 탭이 있는데 여기서 modules탭 클릭
	- 보이는 web module 정보를 클릭하고 remove 반복으로 삭제시킨다. 그리고 저장

	### jsp파일 맨처음에 액박
	page 부분에 액박 마우스를 액박에 대보니 javax...http...에러가 뜬다면
	프로젝트 - 마우스우클릭 - properties - project facets - dynamic web...클릭
	하고 우상단에 있는 runtimes 탭 클릭 -
	톰캣 체크박스를 클릭
	- apply and close
-->

<!-- post 방식 -->
<h1>로그인</h1>
<form action="kajaLogin.jsp" method="post">
	아이디(한글) <input type="text" name="id" required><br>
	암호 <input type="password" name="pw" required><br>
	나이 <input type="text" name="age" required><br>
	<input type="submit" value="가자 서버로">
	<input type="reset" value="취소">
</form>

<form action="kajaLogin1.jsp" method="get">
	아이디(한글) <input type="text" name="id" required><br>
	암호 <input type="password" name="pw" required><br>
	나이 <input type="text" name="age" required><br>
	<input type="submit" value="가자 서버로">
	<input type="reset" value="취소">
</form>

</body>
</html>
* post 방식의 서버
<%@page import="java.util.Date"%>
<%@ page language="java" contentType="text/html; charset=EUC-KR"
    pageEncoding="EUC-KR"%>

<h2>나는 로그인 받는 서버</h2>

<h2>post의 데이터전송 및 한글처리</h2>

<%
	//===================================================================
	request.setCharacterEncoding("EUC-KR"); // post의 한글처리방식
	response.setCharacterEncoding("EUC-KR"); // 내장객체.메소드()
	//===================================================================
	String id = request.getParameter("id");
	String pw = request.getParameter("pw");
	int age = Integer.parseInt(request.getParameter("age"));
%>

<h2>반갑습니다 . 아이디 <%=id %>님<br>
	당신의 암호는 <%=pw %>이고<br>
	당신은 <%=2023-age %>년생이시군요.</h2>
* get 방식의 서버
<%@page import="java.util.Date"%>
<%@ page language="java" contentType="text/html; charset=EUC-KR"
    pageEncoding="EUC-KR"%>

<h2>나는 로그인 받는 서버</h2>

<h2>get의 데이터전송 및 한글처리</h2>

<%

	String id1 = request.getParameter("id1");
	String pw1 = request.getParameter("pw1");
	int age1 = Integer.parseInt(request.getParameter("age1"));
%>

<h2>반갑습니다 . 아이디 <%=id1 %>님<br>
	당신의 암호는 <%=pw1 %>이고<br>
	당신은 <%=2023-age1 %>년생이시군요.</h2>
□ 간단한 BMI 실습
<%@ page language="java" contentType="text/html; charset=EUC-KR"
    pageEncoding="EUC-KR"%>
<!DOCTYPE html>
<html>
<head>
<meta charset="EUC-KR">
<title>Insert title here</title>
</head>
<body>

<form action="bmiCheck.jsp" method="post">
	이름 : <input type="text" name="irum" required><br>
	키 : <input type="text" name="ki" required><br>
	몸무게 : <input type="text" name="moum" required><br>
	<input type="submit" value="제출">
	<input type="reset" value="취소">
</form>

</body>
</html>
<%@ page language="java" contentType="text/html; charset=EUC-KR"
    pageEncoding="EUC-KR"%>
<!DOCTYPE html>
<html>
<head>
<meta charset="EUC-KR">
<title>Insert title here</title>
</head>
<body>

<%
	request.setCharacterEncoding("EUC-KR");
	response.setCharacterEncoding("EUC-KR");

	String irum = request.getParameter("irum");
	double ki = Double.parseDouble(request.getParameter("ki"));
	double moum = Double.parseDouble(request.getParameter("moum"));
	double mki = ki / 100;
	double bmi = moum / Math.pow(mki, 2);

	String result = "";
	if(bmi >= 30.0){
		result = "비만";
	} else if(bmi >= 25.0){
		result = "과체중";
	} else if(bmi >= 20.0){
		result = "보통";
	} else{
		result = "저체중";
	}

%>

<h1>당신의 키와 몸무게 BMI는</h1>
<br>

이름 : <%=irum %><br>
키 : <%=ki %> 몸무게 : <%=moum %><br>
BMI : <%=bmi %> 결과 : <%=result %>
</body>
</html>
□ checkbox & radio
<%@ page language="java" contentType="text/html; charset=EUC-KR"
    pageEncoding="EUC-KR"%>
<!DOCTYPE html>

<!-- input.jsp -->

<html>
<head>
<meta charset="EUC-KR">
<title>Insert title here</title>
</head>
<body>

	<!--
		combo box, checkbox, radio btn

		combo box : textbox + listbox (select - option)
		100 - 최신신상
		200 - 이월상품
		300 - 매장진열상품
	-->

	<form name="f1" action="output.jsp" method="post">
		<table border="2" width="700">
			<tr>
				<td colspan="2">제품종류번호 선택</td>
			</tr>
			<tr>
				<td colspan="2">
					<!-- value값으로 구분 및 서버로 넘어가는 값이 value 값 -->
					<select name="jong1">
						<option value="100-최신신상">100-최신신상</option>
						<option value="200-이월상품">200-이월상품</option>
						<option value="300-매장진열상품">300-매장진열상품</option>
					</select>
				</td>
			</tr>
			<!-- check box -->
			<tr>
				<td colspan="2" align="center">제품선택</td>
			</tr>
			<tr>
				<td colspan="2">
					<input type="checkbox" name="jepoom" value="구두">구두<br>
					<input type="checkbox" name="jepoom" value="옷">옷<br>
					<input type="checkbox" name="jepoom" value="가방">가방<br>
					<input type="checkbox" name="jepoom" value="엑세서리">엑세서리<br>
					<input type="checkbox" name="jepoom" value="무선이어폰">무선이어폰<br>
				</td>
			</tr>
			<!-- radio -->
			<tr>
				<td colspan="2" align="center">결제수단</td>
			</tr>
			<tr>
				<td colspan="2">
					<input type="radio" name="way1" value="카드" required>카드<br>
					<input type="radio" name="way1" value="현금" required>현금<br>
					<input type="radio" name="way1" value="상품권" required>상품권<br>
				</td>
			</tr>
			<!-- 서버로 가자 -->
			<tr>
				<td colspan="2" align="center">
					<input type="submit" value="구매결정">
					<input type="reset" value="취소">
				</td>
			</tr>
		</table>
	</form>

</body>
</html>
□ 브라우저 알아내기
크롬인지를 확인해보자.
<!DOCTYPE html>
<html>
<head>
<meta charset="EUC-KR">
<title>Insert title here</title>
</head>
<body>
<pre>
<h2>
	브라우저 엔진 (chrome, opera-Blink, safari-webkit, ff-gecko(모질라)
		IE - Trident, mac IR-Tasman)

	브라우저를 알아내기(userAgent)
		<script>
			if(navigator.userAgent.indexOf("Chrome") > -1)
				alert("사용중")
		</script>
</h2>
</pre>
</body>
</html>
□ request 객체의 메소드들
<%@ page language="java" contentType="text/html; charset=EUC-KR"
pageEncoding="EUC-KR"%>
<!DOCTYPE html>
<html>
<head>
<meta charset="EUC-KR">
<title>Insert title here</title>
</head>
<body>
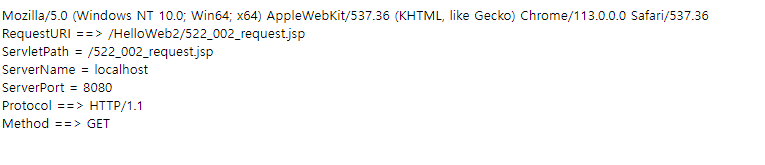
<%=request.getHeader("user-agent") %><br>
<!--
Mozilla/5.0 (Windows NT 10.0; Win64; x64) AppleWebKit/537.36 (KHTML, like Gecko) Chrome/113.0.0.0 Safari/537.36
request 쪽에 대한 브라우저와 device의 사용자 정보
-->
RequestURI ==> <%=request.getRequestURI() %><br>
<!-- /HelloWeb2/522_002_request.jsp -->
<!-- (http://localhost:8080)/프로젝트명/파일.jsp -->
ServletPath = <%=request.getServletPath() %><br>
<!-- (http://localhost:8080)(프로젝트명은 안 나옴)/파일.jsp -->
ServerName = <%=request.getServerName() %><br> <!-- localhost -->
ServerPort = <%=request.getServerPort() %><br> <!-- localhost -->
Protocol ==> <%=request.getProtocol() %><br> <!-- HTTP/1.1 -->
<!-- 1.0, 1.1, 2.0 -->
Method ==> <%=request.getMethod() %><br>
</body>
</html>
□ response.sendRedirect
<!DOCTYPE html>
<html>
<head>
<meta charset="EUC-KR">
<title>Insert title here</title>
</head>
<body>

	<form action="kaja1.jsp" method="get">
		나이 <input type="text" name="na2"><br>
		<input type="submit" value="서버">
		<input type="reset" value="취소">
	</form>

</body>
</html>

<!--
	web에서의 원칙
	원래 가고자 했던 웹 페이지로 가고 결과도 해당 페이지로부터 return한다.

	MVC모델 - 역할로 나누어짐
	model		view(presentation logic)		control(busuness logic)
	db			보여주는							계산, 판단

	여기서 spring은 framework이므로 spring 문법에 맞게 코딩하면 자동적으로 역할을 맡아 순리적으로 돌아간다.

	일반적으로는 명령을 통해 어디로 가라~
-->
* kaja1.jsp
<%@ page language="java" contentType="text/html; charset=EUC-KR"
    pageEncoding="EUC-KR"%>
<!DOCTYPE html>
<html>
<head>
<meta charset="EUC-KR">
<title>Insert title here</title>
</head>
<body>
<pre>
원래는 이 화면이 출력되는 것인데
변신을 해서 다른 화면이 출력된다.
결과는 ddokaja1.jsp에서 client에게..
</pre>

<%
	response.sendRedirect("ddokaja1.jsp");
%>

</body>
</html>
* ddokaja1.jsp
<%@ page language="java" contentType="text/html; charset=EUC-KR"
    pageEncoding="EUC-KR"%>
<!DOCTYPE html>
<html>
<head>
<meta charset="EUC-KR">
<title>Insert title here</title>
</head>
<body>

<pre>
원래 출력 화면이 아님에도 불구하고
response.sendRedirect()로 인하여
이 화면이 출력된다.
</pre>

</body>
</html>
□ 에러 페이지
<!DOCTYPE html>
<html>
<head>
<meta charset="EUC-KR">
<title>Insert title here</title>
</head>
<body>
	<form action="kajaServer.jsp" method="get">
		나이 <input type="text" name="na2">
		<!-- 입력없이 또는 문자를 입력 후 버튼 클릭해본다. -->
		<input type="submit" value="가자 서버로">
		<input type="reset" value="취소">
	</form>
</body>
</html>
* kajaServer.jsp
<%@ page language="java" contentType="text/html; charset=EUC-KR"
    pageEncoding="EUC-KR" errorPage="naerrorpage.jsp" %>
<!--
	기본은 pageEncoding="EUC-KR" only이지만
	errorPage 부분을 추가해보자
	404 나오는 것을 없애자.
-->

<!DOCTYPE html>
<html>
<head>
<meta charset="EUC-KR">
<title>Insert title here</title>
</head>
<body>

<%
	int na2Soo1 = Integer.parseInt(request.getParameter("na2"));

	out.println("나이는 " + na2Soo1);
%>

<!--
	나이를 입력 안 하면 또는 문자입력하면 에러가 발생되어 에러페이지(예 : naerrorpage.jsp)로 간다면 관리를 잘하고 있는 것
-->

</body>
</html>
* naerrorpage.jsp
<%@ page language="java" contentType="text/html; charset=EUC-KR"
    pageEncoding="EUC-KR" isErrorPage="true" %>
<!-- 뒤에 isErrorPage 추가 코딩 -->

<% response.setStatus(200); %>
<%--
	404, 500... : 간혹 이 페이지를 500으로 처리하는 경우 방지
	정상 200 : 이 페이지는 오류없다! 그러니 결과를 잘 출력해라
--%>
<!DOCTYPE html>
<html>
<head>
<meta charset="EUC-KR">
<title>Insert title here</title>
</head>
<body>
<pre>
다음과 같은 에러가 발생했습니다.
계속 에러가 발생되면 상담원에게 전화주시기 바랍니다
전화번호는 02-3456-7890입니다

</pre>

<hr>
<!-- 내장객체 out, request, response, 그리고 exception 객체 -->
에러내용은 <h3> <%=exception.getMessage() %></h3>
<!--
	예 : 나이를 빈칸으로 처리한 경우 에러내용은 For input string: ""
	isErrorPage="true" 없으면 exception 객체 사용못함
-->
</body>
</html>
■ MVC
□ 설명
###### MVC 모델 ######

(참고) front-end : html, javascript, css 별도로 나누어서 작성

[back-end]

model : DB

view(presentation logic) : 보여주기

control : 계산, 판단

### MVC1

- view, control : jsp 담당
- 특별한 교육 등이 없이 작성하기가 쉽다.
- 유지보수가 상대적으로 어렵다.
- 중소형 프로젝트 개발시

### MVC2

- view : jsp, control : servlet 담당(웹자바, httprequest....)
- 배우기가 어렵다.
- 작성하기가 어렵다.
- 유지보수는 상대적으로 쉽다.
- 중대형 프로젝트
■ jsp 액션태그
□ 설명
<!DOCTYPE html>
<html>
<head>
<meta charset="EUC-KR">
<title>Insert title here</title>
</head>
<body>
<pre>

1. 지시어

jsp = html + <% %>(자바)
	  html + <jsp:forward> (가독성을 위해서)

<정적>
포함하고 나서 실행
<%@ include file="head.jsp"%>
기억창고 중복의 가능성이 생김.
상대적으로 속도가 빠르다.

2. action tag

<동적>
실행한 결과를 포함
<jsp:include page="head.jsp"/>
기억창고 중복은 없다.
상대적으로 속도가 느리다.
<jsp:forward page="aa.jsp"/>

### spring thymeleaf tile (web도 가능)

</pre>
</body>
</html>
□ include 예시
<%@ page language="java" contentType="text/html; charset=EUC-KR"
    pageEncoding="EUC-KR"%>
<!DOCTYPE html>
<html>
<head>
<meta charset="EUC-KR">
<title>Insert title here</title>
</head>
<body>
<h2>include 지시어로 파일 포함하기</h2>
우리 회사는 작지만 확실한 행복을 보장하는 이벤트를 드립니다.<br>
방문을 환영합니다!.<br>
<hr>

<%@ include file="includeSub.jsp" %>

</body>
</html>
■ scope
□ 설명
<%@ page language="java" contentType="text/html; charset=EUC-KR"
    pageEncoding="EUC-KR"%>
<!DOCTYPE html>
<html>
<head>
<meta charset="EUC-KR">
<title>Insert title here</title>

<!--
	장바구니 : 청바지 담고 노트북 구경 그리고 다시 왔더니 청바지 담은 게 취소..
	그래서 웹 브라우저를 닫지 않는 한 장바구니는 계속 유지가 되어야 함.

	예) 다른 페이지로 넘어가면 전페이지를 모른다. x
	한 페이지는 ok인데 두 페이지 가니까 모른다. x
	즉, 계속 유지되어야 한다.

	[정보유지]
	1) 장바구니에서도 유지가 되어야 하며
	2) 여기서도 웹 페이지와 웹 페이지 사이에 자료가 계속 전달될 때 정보가 유지

	scope(범위)
	pageContext < request < session < application

	pageContext는 한 페이지에서만
	request는 요청에서 응답까지만(forward) (다음페이지로 이동시 forward 메소드의 인자로 사용)
	session은 1 browser 1 session 형식(장바구니, 로그아웃)
	application 1 was 1 application

	// 범웨어서 해당값 인식을 위해

	("속성명", "값") ==> ("irum", "홍길동")
-->

</head>
<body>

</body>
</html>
□ scope 확인해보자
<%@ page language="java" contentType="text/html; charset=EUC-KR"
    pageEncoding="EUC-KR"%>
<!DOCTYPE html>
<html>
<head>
<meta charset="EUC-KR">
<title>Insert title here</title>
</head>
<body>

<%
	// 범위에서 해당 값 인식을 위해
	// 아래처럼 하면 지금 페이지에 속성명을 가진 기억창고 4개가 만들어진다.
	// scope.저장메소드("속성명", "속성값") // setter, getter
	pageContext.setAttribute("page1", "pagelove"); // 페이지 범위
	request.setAttribute("req1", "reqlove"); // 요청범위
	session.setAttribute("ses1", "seslove"); // 브라우저가 살아있는 동안 // 1 browser - 1 session
	application.setAttribute("app1", "applove"); // WAS가 계속 가동되는 동안 // 1 was - 1 application
%>

<a href="scope2.jsp">scope2.jsp로 이동</a>

<!--
	scope2로 이동해서(즉, 다른 페이지로 이동) 각각의 속석명에 있는 값들을 꺼내서 확인해보자.
-->

</body>
</html>
* scope2.jsp
<%@ page language="java" contentType="text/html; charset=EUC-KR"
    pageEncoding="EUC-KR"%>
<!DOCTYPE html>
<html>
<head>
<meta charset="EUC-KR">
<title>Insert title here</title>
</head>
<body>

<%
	// scope.jsp -> scope2.jsp로 넘어온 것

	out.println((String)pageContext.getAttribute("page1")); // null
	// return type : Object --> (String)으로 형변환

	// forward, include
	// request.setAttribute("req1","reqlove"); // 요청을 연결시킬 근거가 없으므로 null
	// 즉 request로 넘어올 때 값이 전달되어 출력되려면 (null이 안 되려면);
	// 인자에서 request, response에 대한 인자가 함께 처리되면 가능
	out.println((String)request.getAttribute("req1")); // null

	// 브라우저가 닫히지 않는 한 아무리 페이지를 옮겨도 기억창고는 계속 살아있다.
	out.println((String)session.getAttribute("ses1")); // seslove

	out.print((String)application.getAttribute("app1")); // applove

%>

<a href="scope3.jsp">scope3.jsp로 이동</a>

</body>
</html>

* scope3.jsp
<%@ page language="java" contentType="text/html; charset=EUC-KR"
    pageEncoding="EUC-KR"%>
<!DOCTYPE html>
<html>
<head>
<meta charset="EUC-KR">
<title>Insert title here</title>
</head>
<body>

<%
	// scope2.jsp -> scope3.jsp로 넘어온 것

	out.println((String)pageContext.getAttribute("page1"));
	out.println((String)request.getAttribute("req1"));
	out.println((String)session.getAttribute("ses1"));
	out.print((String)application.getAttribute("app1"));
%>

<h3>이제 톰캣을 off한 후 on 한 다음 다시 실행시켜보자.</h3>

</body>
</html>

□ session을 통한 login 관리 실습
<!DOCTYPE html>
<html>
<head>
<meta charset="EUC-KR">
<title>Insert title here</title>

<!--
	프로그램 구성
	로그인 - 쇼핑몰 화면 - 상품구입 형태로 진행

	로그인을 하면 예를 들어 id = babo & pw = ondal이 정상적인 로그인이라면
	페이지가 넘어가도 id, pw는 항상 따라 다녀야 한다.
	왜냐하면 중간에 로그인 없이 들어오는 경우를 막아야 하기 때문이다.

	그래서 페이지마다 id, pw를 확인하는 질문을 하는 경우가 있다.
	이럴 때 session을 사용한다. 즉 로그인 id와 pw를 session의 속성창에 넣어놓고
	매 페이지마다 id = babo & pw = ondal을 물어봐서 맞다면 정상진행한다.
-->

</head>
<body> <!-- index.html(web에서는 기본적으로 start 파일)
				spring boot : 기본 출력파일 index.html -->

<h1>로그인</h1>

<form action="kajaShopping.jsp" method="get">
	아이디 <input type="text" name="id1"><br>
	암호 <input type="password" name="pw1"><br>
	<input type="submit" value="가자서버로">
	<input type="reset" name="취소">
</form>

</body>
</html>
* kajaShopping.jsp
<%@ page language="java" contentType="text/html; charset=EUC-KR"
    pageEncoding="EUC-KR"%>
<!DOCTYPE html>
<html>
<head>
<meta charset="EUC-KR">
<title>Insert title here</title>
</head>
<body>
<h2>뭘 살까?</h2>

<%
	String id1 = request.getParameter("id1");
	String pw1 = request.getParameter("pw1");
%>

아하 id는 <%=id1%>이고 암호는 <%=pw1%>이군요<p>

<%
	session.setAttribute("sid1", id1);
	session.setAttribute("spw1", pw1);
%>

<!--
	session 하나 안에 속성창 2개를 만든 것
	ㄴ 속성창 sid1
	ㄴ 속성창 spw1
-->

가방 쇼핑은 <a href="kabang.jsp">여기</a>를 누르세요<br>
구두 쇼핑은 <a href="koodoo.jsp">여기</a>를 누르세요<br>

</body>
</html>

* kabang.jsp
<%@ page language="java" contentType="text/html; charset=EUC-KR"
pageEncoding="EUC-KR"%>
<!DOCTYPE html>
<html>
<head>
<meta charset="EUC-KR">
<title>Insert title here</title>
</head>
<body>
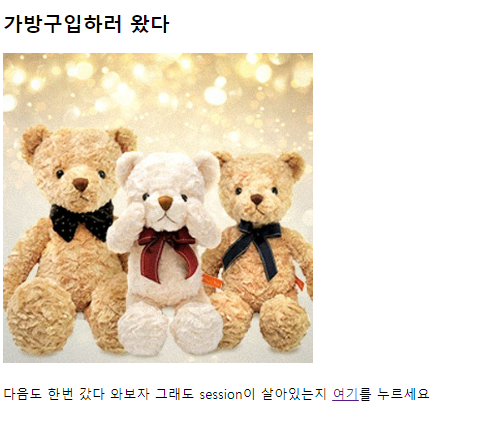
<h2>가방구입하러 왔다</h2>
<%
String sid1 = (String)session.getAttribute("sid1");
String spw1 = (String)session.getAttribute("spw1");
/*
속성명 생성 : session.setAttribute
속성명 읽기 : session.getAttribute
속성명 하나 삭제 : session.removeAttribute(spw1)
세션 삭제 : session.invalidate()
세션 유효시간설정(cookie처럼)
session.setMaxInactiveInterval(60*60) // 3600초 : 1시간
session.getMaxInactiveInterval()
속성명 모두알기(출력은 Enumeration 사용해야)
session.getAttrubuteNames()
*/
/*
만일 babo, ondal이 아니면 로그인화면으로 강제로 보내버리고 로그인화면이라면 가방 사진을 보여주고 싶다면 로직은?
1 and 2 ==> !1 or !2
*/
if(!sid1.equals("babo") || !spw1.equals("ondal")){
out.println("<h2>id 및 암호 입력에러입니다 로그인 화면으로 갑니다</h2>");
out.println("<a href='523_000_session_index.html'>여기</a>를 누르세요<br>");
} else{
out.println("<img src='gom.jpg'>");
// 즉 id, 암호가 맞으면 여기에 상품 출력 나와서 사게 한다
}
%><br><br>
다음도 한번 갔다 와보자 그래도 session이 살아있는지
<a href="http://www.daum.net">여기</a>를 누르세요<br>
</body>
</html>
id를 babo, 암호를 ondal로 했을 경우는 다음과 같은 화면이 나온다. 그렇지 않으면 에러 문구가 나온다.
□ session을 이용한 장바구니 구현
<%@ page language="java" contentType="text/html; charset=EUC-KR"
    pageEncoding="EUC-KR"%>
<!DOCTYPE html>
<html>
<head>
<meta charset="EUC-KR">
<title>장바구니</title>
</head>
<body>

<hr>
	<h2>쇼핑몰 상품을 선택하고 수량을 입력한 후 장바구니에 담으세요</h2>
	<form action="523_001_output.jsp">
		<select name="sangpum">
			<option value="bag">가방(1개 50000)</option>
			<option value="koodoo">구두(1개 70000)</option>
			<option value="tie">넥타이(1개 15000)</option>
		</select>
		<input type="text" name="cnt" size="3">개
		<br><br>
		<input type="submit" value="장바구니담기">
		<input type="reset" value="안사">
	</form>
</body>
</html>

<!--
	522_001_output.jsp에서 받는 문법은?

	request.getParameter(이름)
	select 태그에서는 select 이름(sangpum)
	갯수 이름 (cnt)
-->

* 523_001_output.jsp
<%@ page language="java" contentType="text/html; charset=EUC-KR"
pageEncoding="EUC-KR"%>
<!DOCTYPE html>
<html>
<head>
<meta charset="EUC-KR">
<title>Insert title here</title>
</head>
<body>
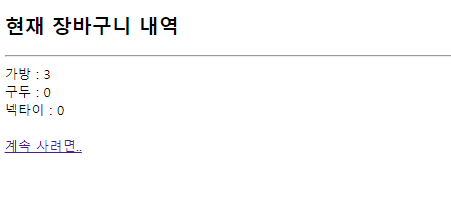
<%
String sangValue = request.getParameter("sangpum");
String cntValue = request.getParameter("cnt");
// 웹 페이지 값을 다른 페이지로 전달하는 경우 or 장바구니에는 session 사용
// 웹 페이지 값을 다른 페이지로 전달하는 경우
// ==> 로그인 id나 pw를 session에 저장하면
// -page 작성시 db에서 read하여 내 id, pw를 출력확인해줌
// 암호를 잊어버리면 db에서 꺼낸다.
// session.invalidate()는 logout 기능
// 회원탈퇴는 db에서 id, pw를 삭제
// 장바구니
// session : 가방, 구두, 넥타이 별로 속성명을 사용하여 각각 준비되어 있다면
// 해당 상품에 갯수를 누적해야 하는데, 그러므로 일단 session이 있다고 가정하고 누적시작.
// 가방 10 + 1
// 구두 3 + 5+ 7
// 넥타이 2 + 3
// 일단 상품명과 수량이 넘어왔기 때문에 현재 session에 있는 상품별 수량이 얼마인지를 알아야 한다.
// 기존 세션 수량 + 추가되는 수량
// 그러므로 세션을 먼저 읽어야 한다. 그다음에 수량 누적을 위해 무슨 상품이 넘어왔는지를 물어보면서 작업
// ArrayList도 사용 가능하다.
Object obj1 = session.getAttribute("cnts1"); // 가방 개수
Object obj2 = session.getAttribute("cnts2"); // 구두 개수
Object obj3 = session.getAttribute("cnts3"); // 넥타이 개수
int cnt1 = 0, cnt2 = 0, cnt3 = 0, cnt = 0; // 초기치
if(obj1 != null){
/* 처음이면(session 없으면 obj1은 null) */
cnt1 = (Integer)obj1; // 값이 있으면 cnt1에 넣음
}
if(obj2 != null){
cnt2 = (Integer)obj2;
}
if(obj3 != null){
cnt3 = (Integer)obj3;
}
// 분류작업 (이건 개발시 세션을 만든 다음에 작성하게 됨)
/* 가방이 5개라면 */
cnt = Integer.parseInt(cntValue);
// cnt1, 2, 3는 세션에 저장되어 있는 값
// 만일 처음이라면 cnt1, 2, 3는 초기치 준 0이 모두 들어가 있음(전에 누적된 수량은 당연히 X)
// 어떤 상품인지를 파악
if("bag".equals(sangValue)){
cnt1 += cnt;
}
if("koodoo".equals(sangValue)){
cnt2 += cnt;
}
if("tie".equals(sangValue)){
cnt3 += cnt;
}
/* 세션에 제대로 된 속성값 저장 */
/* 처음일 경우 cnts1 이름이 만들어지고 cnt1 개수(가방 5개)가 저장 */
session.setAttribute("cnts1", cnt1);
session.setAttribute("cnts2", cnt2);
session.setAttribute("cnts3", cnt3);
%>
<h2>현재 장바구니 내역</h2>
<hr>
<%if(cnt != 0) {%> 가방 : <%=cnt1%> <%} %><br>
<%if(cnt != 0) {%> 구두 : <%=cnt2%> <%} %><br>
<%if(cnt != 0) {%> 넥타이 : <%=cnt3%> <%} %><br><br>
<a href="523_001_session_shopping_cart.jsp">계속 사려면..</a>
</body>
</html>
■ cos.jar
□ 설명
### cos.jar 다운로드 및 설치

- http://servlets.com/cos/에서 cos-22.05.zip(cos-26Dec2008.zip)을 다운로드 후 압출풀기 (cos-20.08.zip)

- 압축 푼 폴더의 cos-22.05.zip(cos-26Dec2008)/lib의 cos.jar 파일을 복사 (cos-22.05.zip)

- /webapp/WEB-INF/lib/ 안에 넣는다.

- 프로젝트 이름 - F5(새로고침) (프로젝트명 - 마우스우클릭 - refresh(새로고침))

- upload전에 d:에 upbang 폴더를 하나 만든다.

- 바탕화면에 올릴 파일 하나를 준비한다.

== 그러니까 "사용자"의 바탕화면에 있는 kabang.jpg를 서버의 "d 드라이버 (upbang 폴더)"에 올리는 것.
□ 파일 업로드 1 (1개)
<!DOCTYPE html>
<html>
<head>
<meta charset="EUC-KR">
<title>request</title>
</head>
<body>

<!-- cos.jar .jar는 .class의 집합 .class는 실행가능한 파일 -->
<h1>file upload</h1>
<form action="uploadtoserver.jsp" method="post" enctype="multipart/form-data">

	이름 <input type="text" name="irum1"><br> <!-- cos.jar의 multipart -->
	파일 <input type="file" name="file1"><br>
	<input type="submit" value="가자업로드"><br>
	<input type="reset" value="취소">

</form>

</body>
</html>
* uploadtoserver.jsp
<%@page import="com.oreilly.servlet.multipart.DefaultFileRenamePolicy"%>
<%@page import="com.oreilly.servlet.MultipartRequest"%>
<%@ page language="java" contentType="text/html; charset=EUC-KR"
    pageEncoding="EUC-KR"%>
<!DOCTYPE html>
<html>
<head>
<meta charset="EUC-KR">
<title>Insert title here</title>
</head>
<body>
<h2>upload하자</h2>

<%
	String bang = "c:/upbang";

// 아래 부분이 실제로 업로드되는 문장, 괄호안에 인자는 초기치므로 생성자를 찾아가 처리할 것을 짐작.
	MultipartRequest mr1 = new MultipartRequest(request, bang, 10*1024*1024, "EUC-KR", new DefaultFileRenamePolicy());
	// request 객체, 경로, 업로드파일의최대크기(10MB), 한글처리, DefaultFileRenamePolicy : 파일이름 충돌시 새로운 이름으로 변경.

	// request 사용 못하므로 대신 MultipartRequest 객체 사용.

	String virum1 = mr1.getParameter("irum1");
	String vfilename1 = mr1.getFilesystemName("file1"); // 파일 이름 얻기

	if(vfilename1 != null){
		out.println("사용자 이름은 " + virum1 + "이시구요" + "<br>");
		out.println("추카추카 " + vfilename1 + "라는 파일 올리기 성공 했네요.");
	}
%>

</body>
</html>
□ 파일 업로드 2 (여러개)
<!DOCTYPE html>
<html>
<head>
<meta charset="EUC-KR">
<title>Insert title here</title>
</head>
<body>

<!-- 여러개의 파일처리 -->

<h1>file upload</h1>
<form action="uploadtoserver2.jsp" method="post" enctype="multipart/form-data">

	이름 <input type="text" name="irum1"><br>
	파일 <input type="file" name="file1[]" multiple><br>
	<!-- 여기서 여러개의 파일을 ctrl로 선택하여 보냄 -->

	<input type="submit" value="가자업로드"><br>
	<input type="reset" value="취소">

</form>
</body>
</html>
* uploadtoserver2.jsp
<%@page import="com.oreilly.servlet.multipart.DefaultFileRenamePolicy"%>
<%@page import="com.oreilly.servlet.MultipartRequest"%>
<%@ page language="java" contentType="text/html; charset=EUC-KR"
    pageEncoding="EUC-KR"%>
<!DOCTYPE html>
<html>
<head>
<meta charset="EUC-KR">
<title>Insert title here</title>
</head>
<body>

<%
	String bang = "c:/upbang";

	// ArrayList<String> arr1 = new ArrayList<String>();
	MultipartRequest mr1 = new MultipartRequest(request, bang, 10*1024*1024, "EUC-KR", new DefaultFileRenamePolicy());

	String virum1 = mr1.getParameter("irum1");


		out.println("사용자 이름은 " + virum1 + "이시구요" + "<br>");
		out.println("추카추카 파일 올리기 성공 했네요.");
%>

</body>
</html>
□ MVC1 모델 (학점계산)
<%@ page language="java" contentType="text/html; charset=EUC-KR"
    pageEncoding="EUC-KR"%>
<!DOCTYPE html>
<html>
<head>
<meta charset="EUC-KR">
<title>Insert title here</title>
</head>
<body>
<!-- MVC1이지만 0.5 정도 된다. -->
<h1>학점계산</h1>

<form method="post" action="h_output.jsp">
	이름 <input type="text" name="irum"><br>
	점수입력 <input type="text" name="jum"><br>
	<input type="submit" value="가자서버로">
	<input type="reset" value="취소">
</form>

</body>
</html>

* h_output.jsp
<%@ page language="java" contentType="text/html; charset=EUC-KR"
    pageEncoding="EUC-KR"%>
<!DOCTYPE html>
<html>
<head>
<meta charset="EUC-KR">
<title>Insert title here</title>
</head>
<body>

<%
	String irum = request.getParameter("irum");
	String jum1 = request.getParameter("jum");

	int jum = Integer.parseInt(jum1);

	// 학점계산 : controller가 하는 일, mvc1에서는 jsp가 한다.

	// input - controller (계산, 판단, business logic (by jsp) - view(출력, presentation logic, (by jsp));

	// 입력을 받아서 계산, 판단을 해야 하므로 지금 여기는 controller 역할의 jsp.

	String kaja = null;

	if(jum >= 90){
		kaja = "A";
	} else if(jum >= 80){
		kaja = "B";
	} else if(jum >= 70){
		kaja = "C";
	} else if(jum >= 60){
		kaja = "D";
	} else{
		kaja = "F";
	}

%>

<!-- view logic도 jsp가 담당 -->
<%--
	아하 이름은 <%=irum %>이시고<br>
	학점은 <%=kaja %> 학점이시군요.
--%>

<%
	request.setAttribute("babo", "ondal");
%>

<%

	// sendRedirect는 방향만 바꾼다.
	request.getRequestDispatcher("/jspview/" + kaja + ".jsp").forward(request, response);
								// /jspview폴더/A.jsp (if 100점이라면)
	// forwarding이기 때문에 A.jsp 화면이 출려되어도 url은 h_output.jsp이다.

	/*
		(참고) /jspview폴더/A.jsp 만들기
		wepapp - 마우스우클릭으로 jspview 폴더 작성
		jspview - 마우스우클릭 - A.jsp 작성

	*/
%>

</body>
</html>
* A.jsp (각각의 학점마다 페이지를 나눠서 만들면 된다.)
<%@ page language="java" contentType="text/html; charset=EUC-KR"
    pageEncoding="EUC-KR"%>
<!DOCTYPE html>
<html>
<head>
<meta charset="EUC-KR">
<title>Insert title here</title>
</head>
<body>

<!-- only view만 있는 영역 -->
<!-- (1)  -->
<h1><%=request.getParameter("irum") %>님</h1>
<h1>A학점이시군요.</h1>

<!-- (2) scope -->
그리고 <%=request.getAttribute("babo") %>님!
<h2>전 페이지도 만났는데 여기서도 만나네요!</h2>

<!-- (3) EL언어(Expression language) -->
<h1>${param.irum }님의 점수는 ${param.jum }점이시군요</h1>
<h1>A학점입니다.</h1>

<a href="523_005_mvc1_hakjum_input"></a>

</body>
</html>

■ useBean
□ 설명
useBean

DAO VO 선수학습 효과
spring은 useBean 문법을 많이 활용

#### javabean

가독성 -자바모양은 가급적 안 보이게 하고 tag 형식 사용.

객체를 만드는 방법 :

1) 자바는 new 클래스명()
2) jsp에서는 <jsp:useBean id="객체명" class="패키지명.클래스명"/>
3) 스프링에서는 <bead id="객체명" class="패키지명.클래스명"/>

값을 넣으려면 :

1) 자바 : name에 값을 넣으려면 객체.setName();
2) 자바빈에서는 : <jsp:setProperty...>

값을 빼려면

1) 자바 : getName();
2) 자바빈 : <jsp:getProperty...>
□ 기본 실습 1
일단 자바파일을 만들어야 한다.
sawonpkg 패키지의 Sawon.java 파일을 만들어보자.
package sawonpkg;

// 사용시 자바코드를 src 방에, 객체 생성 및 사용은 jsp가 함.
// (1) 분리 : 코드가 덜 복잡해진다.
// (2) 재사용이 가능.
// (3) 가독성

public class Sawon { // (4) implements java.io.Serializable // 직렬화 (해도 되고 안 해도 된다.)

	private String irum; // (1) 속성은 private
	private String na2;

	// 인자없는 생성자, getter, setter 만들기
	public Sawon() { // (3) 인자없는 생성자

	}

	public String getIrum() { // (2) public
		return irum;
	}

	public void setIrum(String irum) {
		this.irum = irum;
	}

	public String getNa2() {
		return na2;
	}

	public void setNa2(String na2) {
		this.na2 = na2;
	}

}
* 523_007_sawon.jsp
<%@ page language="java" contentType="text/html; charset=EUC-KR"
    pageEncoding="EUC-KR"%>

<jsp:useBean id="sawon1" class="sawonpkg.Sawon"/>
<jsp:useBean id="sawon2" class="sawonpkg.Sawon"/>

<!DOCTYPE html>
<html>
<head>
<meta charset="EUC-KR">
<title>Insert title here</title>
</head>
<body>

<jsp:getProperty name="sawon1" property="irum"/><br>
<!--
	action tag, name은 userBean의 id를 의미
	객체.메소드()			sawon1.getIrum()
-->
<jsp:getProperty name="sawon1" property="na2"/><br>
<!-- sawon1.getNa2(); -->

<!--
	이름, 나이에 아무것도 없으므로 여기까지 코딩후 실행하면
	null, null
-->

<jsp:setProperty name="sawon1" property="irum" value="세젤예는 누구? 나!"/><br>
<!-- sawon1.setIrum("세젤예는 누구? 나"); -->

<jsp:setProperty name="sawon1" property="na2" value="24"/><br>
<!-- sawon1.setNa2("24"); -->

<jsp:getProperty name="sawon1" property="irum"/><br>
<jsp:getProperty name="sawon1" property="na2"/><br>

</body>
</html>

□ 기본 실습 2
<%@ page language="java" contentType="text/html; charset=EUC-KR"
    pageEncoding="EUC-KR"%>
<!DOCTYPE html>
<html>
<head>
<meta charset="EUC-KR">
<title>입력</title>
</head>
<body>

<h2>입력</h2>
<form action="kajaa.jsp" method="post">
	이름 <input type="text" name="irum"><br>
	나이 <input type="text" name="na2"><br>
	<input type="submit" value="가자서버로">
	<input type="reset" value="취소">
</form>
</body>
</html>
<%@ page language="java" contentType="text/html; charset=EUC-KR"
    pageEncoding="EUC-KR"%>
<!DOCTYPE html>
<html>
<head>
<meta charset="EUC-KR">
<title>Insert title here</title>
</head>
<body>

<%
	request.setCharacterEncoding("EUC-KR");
	response.setCharacterEncoding("EUC-KR");
%>

<%-- <%
	// (1) 평상시 방법

	String irum = (String)request.getParameter("irum");
	String na2 = (String)request.getParameter("na2");

	out.println("여기는 자바스타일로 해서 결과 출력 " + irum + ", " + na2 + "<br>");
%> --%>

<jsp:useBean id="sawon1" class="sawonpkg.Sawon"/>
<jsp:useBean id="sawon2" class="sawonpkg.Sawon"/>

<!--
	넘어오는 irum 및 na2를 setter로 받기
	sawon1.setIrum(request.getParameter("irum")
	sawon1.setNa2(request.getParameter("na2")
-->

<jsp:setProperty name="sawon1" property="irum"/>
<jsp:setProperty name="sawon1" property="na2"/>

<!--
	만일 입력돼서 넘어오는 내용이 20개라면 여기에 코딩하는 줄은 너무 길어질 것..
-->

<jsp:setProperty name="sawon2" property="*"/>

<jsp:getProperty name="sawon1" property="irum"/><br>
<jsp:getProperty name="sawon1" property="na2"/><br>

<jsp:getProperty name="sawon2" property="irum"/><br>
<jsp:getProperty name="sawon2" property="na2"/><br>

</body>
</html>'IT&코딩 > 국비지원' 카테고리의 다른 글
| MVC1 모델 최종 (사원관리 프로그램) (0) | 2023.05.26 |
|---|---|
| JSP, EL, JSTL - 2 (0) | 2023.05.26 |
| Ajax (0) | 2023.05.24 |
| jQuery (0) | 2023.05.22 |
| 자바스크립트 - 2 (0) | 2023.05.18 |


